

It’s a feeling every RVer knows and dreads: the awful grinding sound of a slide-out stopping dead in its tracks. Or worse, the dead silence when you push the button and absolutely nothing happens. Your mind immediately jumps to the worst-case scenario—a busted motor, a fried circuit board, a massive repair bill.
But before you panic, take a deep breath. In my experience, the number one culprit behind RV slide out problems is surprisingly simple: not enough power. Those motors are incredibly thirsty for electricity, and they won't budge without a solid, steady supply.
What To Do When Your RV Slide Out Is Stuck
When a slide-out gets stuck, your first move shouldn't be to grab a toolbox. It should be to check your power. The powerful motors that move hundreds (or thousands) of pounds of wall, furniture, and appliances are almost always running on your 12-volt DC system.
Even when you're hooked up to shore power, the slide mechanism is typically wired to pull juice directly from your house batteries. If those batteries are low, the motor just doesn't have the oomph to get the job done. It's like trying to start a car with a weak battery – you might get a click, but that's about it.
First, Check Your Power Sources
A weak battery is the low-hanging fruit of slide-out troubleshooting. Always start here.
- Look at Your Battery Voltage: Your house batteries need to be in good shape. A fully charged 12-volt battery should be reading 12.6 volts or higher. If you're seeing anything less, you've likely found your problem.
- Plug Into Shore Power: If you’re not already connected, plugging into a pedestal can give your system the boost it needs. Your RV’s converter will kick in, helping to charge the batteries while also supplying power directly to the motor.
- Fire Up the Engine: For motorhome owners, this is the easiest trick in the book. Starting your engine brings the alternator online, which immediately sends a powerful charge to your house batteries. This often provides more than enough amperage to get a stubborn slide moving again.
A crucial habit to get into is making sure your rig is perfectly level before you even think about touching the slide controls. An unlevel RV puts a ton of uneven stress and torque on the slide mechanism, causing it to bind up and potentially leading to serious damage over time. For a full walkthrough, check out our guide on how to level an RV.
#rv #rvlife #rvliving #rvlifestyle #rvrenovation #rvremodel
#rvtravel #rvcamping #rvadventures #ruralwifi #5gwifi
#5ginternet
Got Power? Check Fuses and Breakers
If your batteries are topped off but the slide still won't move, it's time to check the safety devices. A blown fuse or a tripped breaker is the next most common issue. These little things are designed to fail in order to protect your expensive slide motor from a power surge.
In fact, digging through RV forums and talking to service techs reveals a telling statistic: over 40% of RV slide-out service calls are rooted in electrical or power supply issues. It just goes to show how often the fix is simple. For more on common power problems in RVs, Seeking The RV Life is a great resource.
Find your RV's fuse panel (it could be in a few different spots, so check your owner's manual) and locate the fuse for the slide-out system. If it's blown, pop in a new one—but make sure it's the exact same amperage. Never, ever use a higher-rated fuse. That's a recipe for disaster and a serious fire risk.
Before you start troubleshooting, run through this quick checklist. It covers the most common culprits and can often get you back up and running in minutes.
| Initial Diagnostic Checklist for a Stuck Slide Out |
|---|
| Check Point |
| What to Look For |
| Simple Fix |
| Battery Voltage |
| Is the 12V battery reading below 12.6 volts? |
| Connect to shore power or start the engine (motorhome) to charge the batteries. |
| Shore Power Connection |
| Are you connected to a reliable power source? Is the campground pedestal working correctly? |
| Plug in the RV. If already plugged in, test the outlet with another device to confirm power. |
| Fuses/Breakers |
| Check the 12V fuse panel for a blown fuse labeled "slide," "slide-out," or similar. Check breakers for a tripped switch. |
| Replace the fuse with one of the exact same amperage. Reset the breaker. |
| RV Level |
| Is the RV parked on uneven ground? Is the frame twisted or stressed? |
| Move the RV to a level spot and follow proper leveling procedures before operating the slide. |
| External Obstructions |
| Is a tree branch, campground post, picnic table, or other object blocking the slide's path? |
| Clear any and all obstacles from around the slide-out box before attempting to move it. |
This initial once-over will resolve the vast majority of "stuck slide" situations. If you've gone through all these steps and are still having trouble, then it might be time to look at the mechanical side of things.
Diagnosing Mechanical and Structural Failures
So, you've checked all the power sources and everything looks good, but the slide is still refusing to budge. Time to put down the multimeter and start looking at the hardware. This is when we shift from electrical gremlins to mechanical and structural problems.
These kinds of failures often give you clear warning signs—if you know what to look and listen for. Pay close attention to exactly what the slide does (or doesn't do) when you hit that button.
A classic sign of trouble is a slide that moves unevenly, where one side starts extending or retracting while the other is stuck or lagging way behind. You might also be hearing some nasty sounds. Grinding, popping, or squealing are not the sounds of a happy slide-out. These noises are your RV's way of screaming for help, pointing to things like worn-out gears, junk in the tracks, or even a bent frame causing things to bind up.
Listening for Clues and Spotting Misalignment
Figuring out if you have a simple fix or a major headache on your hands starts with using your senses.
That awful grinding noise? It often means gear teeth are stripped or that rocks, twigs, or other debris have gotten jammed in the mechanism. A loud, sudden pop can be even more serious—it could be a shear pin breaking under stress or the slide actually jumping a tooth on the gear track.
Your eyes are just as important. Take a few steps back from your rig and give the slide-out a good, hard look.
- Does the whole box look tilted or crooked in the opening?
- Check the gaps between the slide flange and the RV wall. Are they even all the way around, or is one side tight and the other wide?
- When you try to move it, does one corner lurch forward while the other stays put?
If you answered yes to any of those, you're almost certainly looking at a misalignment or a structural issue. This is one of those problems that only gets worse, putting a massive amount of strain on the motors and the entire system.
Believe it or not, an estimated 20-25% of slide-out repairs are directly caused by uneven slide extensions and the gear wear that results. It really shows how critical proper alignment is for the long-term health of these systems.
This infographic can help you walk through the first few diagnostic steps, starting with the simple electrical checks before you dive into the mechanical side of things.
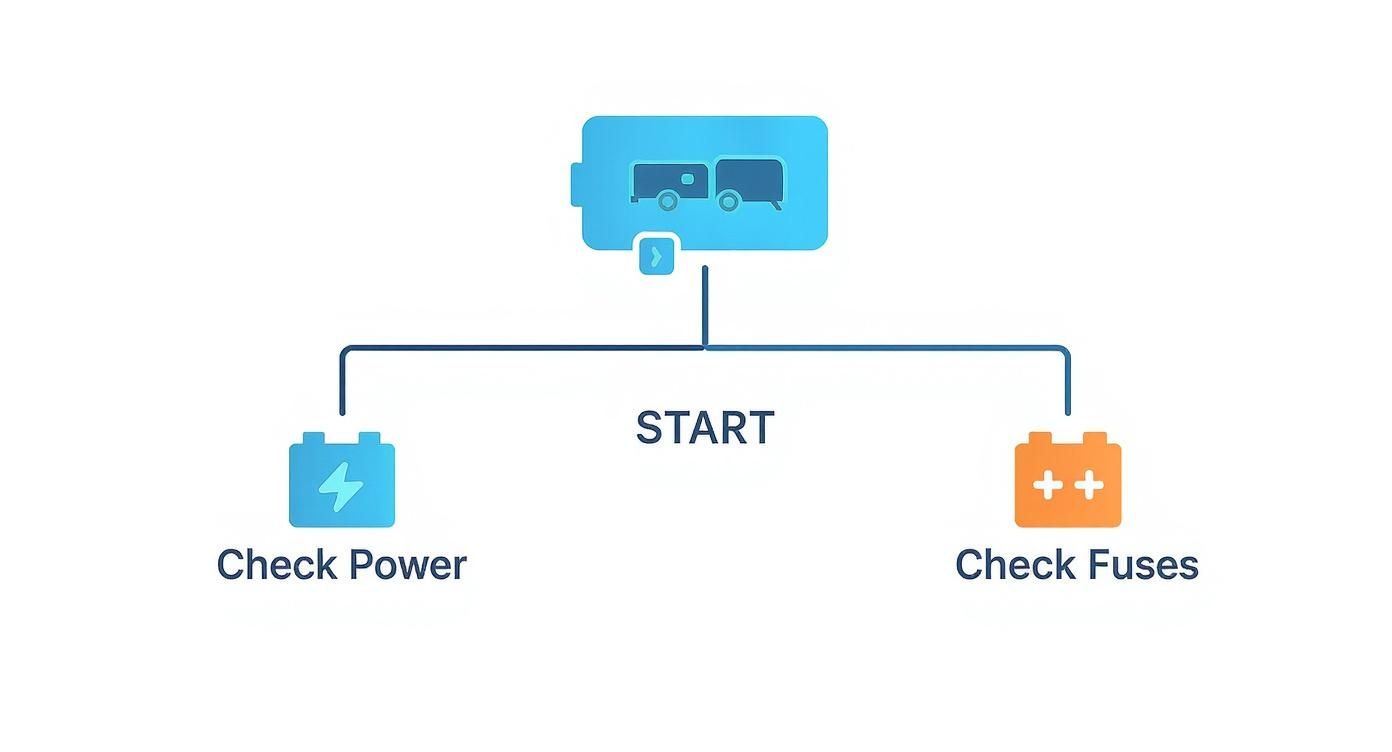
As you can see, once you've confirmed your power and fuses are good, your next move is to check for obstructions and mechanical issues.
The Critical Role of Slide Seals
While you're inspecting all the moving parts, don't forget about the big rubber seals that frame the entire slide-out. These are your first and best line of defense against water. If they're torn, cracked, or have pulled away from the wall, they can easily get snagged in the mechanism and jam the whole works.
Even more important, damaged seals are a welcome mat for water to get into your RV's walls. This is where a small problem can turn into a catastrophe, leading to wood rot, delamination, and mold. What starts as a simple torn seal can spiral into a structural nightmare that costs a fortune to fix.
Think of it like this: you'd never ignore a problem with your roof, and these seals are just as vital. For more on keeping your rig's exterior in top shape, you might find our guide on RV awning replacement parts helpful. Protecting all these outer components is the secret to making your RV last.
#rv #rvlife #rvliving #rvlifestyle #rvrenovation #rvremodel
#rvtravel #rvcamping #rvadventures #ruralwifi #5gwifi
#5ginternet
Understanding Your RV Slide Out System
To have any hope of fixing rv slide out problems, you first need a solid grasp of what you’re working with. Not all slide-out mechanisms are built the same, and what fixes one type can be totally wrong—even damaging—for another. Getting to know your system is ground zero for smart troubleshooting.
Your RV most likely has one of three main slide-out systems, and each one comes with its own quirks and common points of failure. Just figuring out which one you have is a huge step, as it immediately narrows down what could be wrong. Trust me, fixing a hydraulic leak is a completely different world from repairing a snapped cable or a stripped gear.
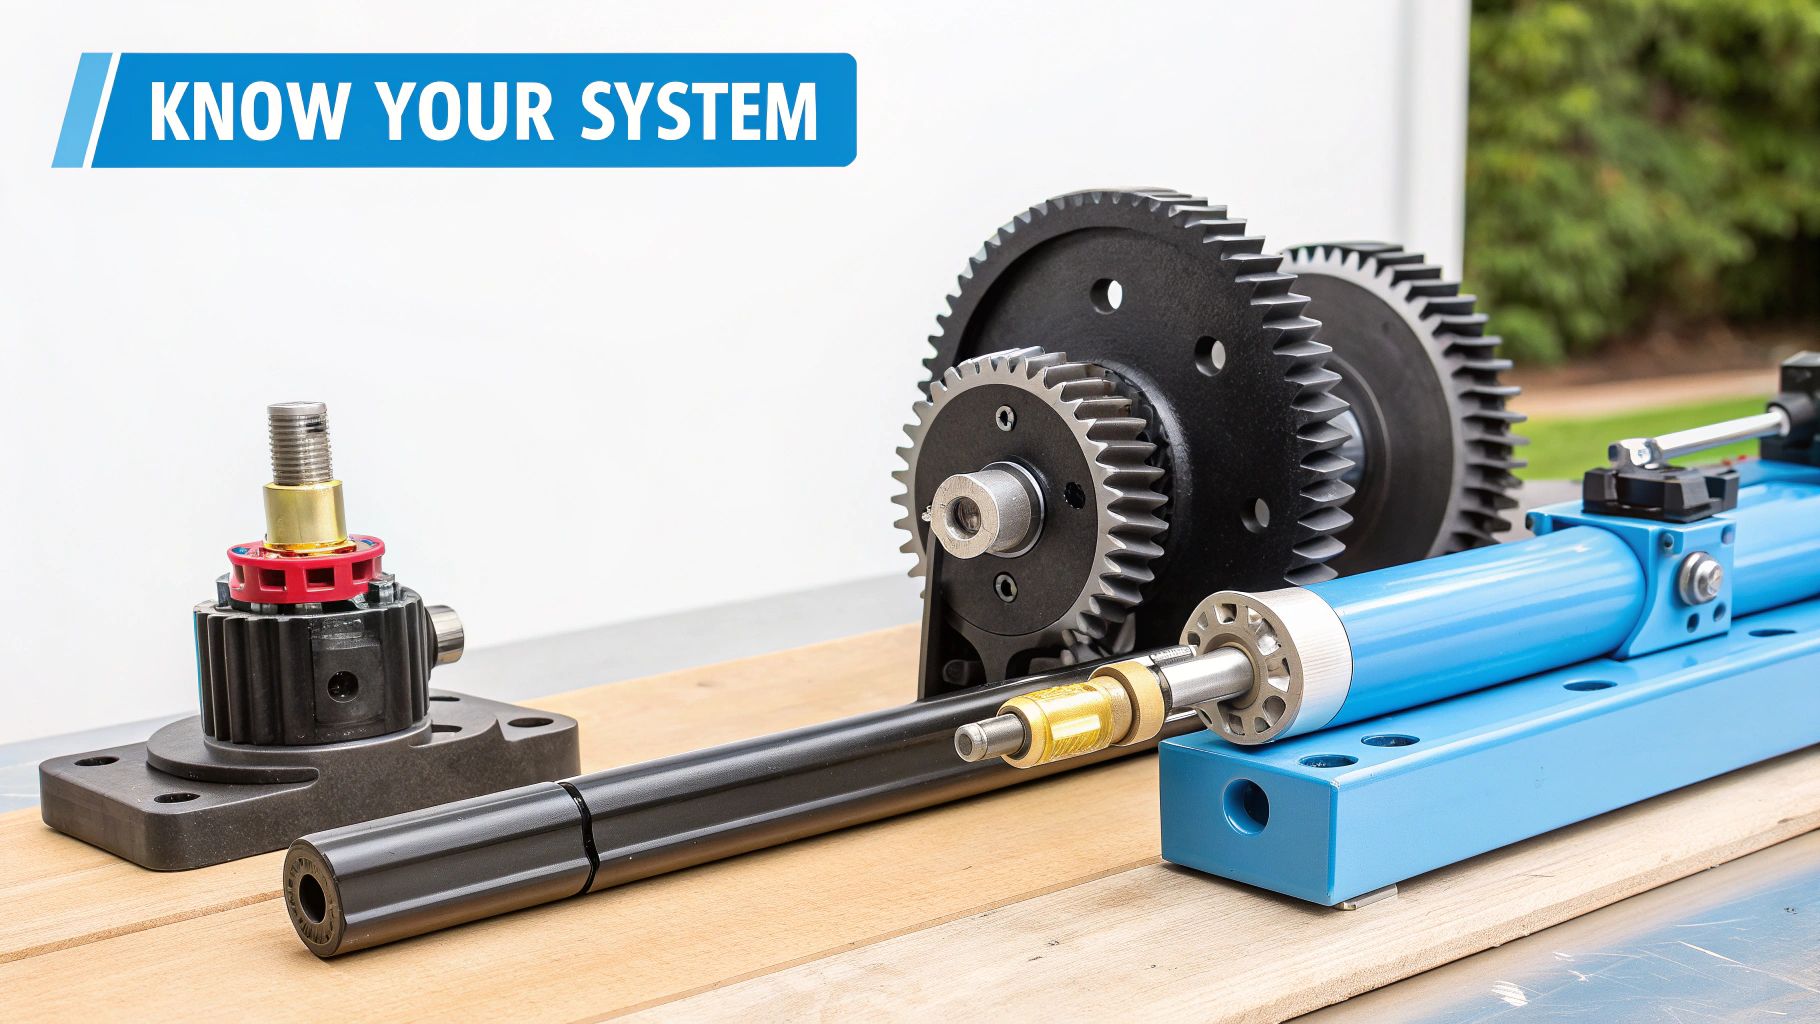
Common RV Slide Out Mechanisms
The most common and, frankly, most reliable system you'll find in modern RVs is the rack and pinion, sometimes called an electric through-frame slide. The design is beautifully simple: a motor turns a gear (the pinion) that travels along a toothed track (the rack), pushing the room in and out. With fewer moving parts, it has become the durable industry standard for a good reason.
You might also have one of these other types:
- Cable-Driven Systems: You'll see these on lighter slide-outs. They rely on a network of cables and pulleys to do the job. They work well, but over time, those cables can stretch, fray, or even snap, which throws the whole slide out of alignment.
- Hydraulic Systems: These are the heavy lifters, reserved for the largest and heaviest full-wall slides. They use hydraulic fluid and powerful rams for incredible pushing power. Their Achilles' heel? Leaks. A busted hose, a loose fitting, or a worn-out seal can lead to a total loss of operation.
The rack and pinion's design has proven so solid that its widespread adoption has directly led to fewer headaches for owners. Technicians I've talked to have seen slide-out repair calls drop by around 30% over the last decade as manufacturers have moved away from older, fussier cable-driven models. You can learn more about the evolution of slide-out systems at The RV Geeks.
#rv #rvlife #rvliving #rvlifestyle #rvrenovation #rvremodel
#rvtravel #rvcamping #rvadventures #ruralwifi #5gwifi
#5ginternet
Why Your System Type Matters
Knowing your slide-out type is everything because it tells you exactly where to start looking when trouble pops up.
Hear a grinding noise? If you have a rack and pinion, your first move should be to check the gear teeth for damage or debris. But if you have a hydraulic system and hear a whining pump, you need to be checking the hydraulic fluid reservoir, pronto.
Recognizing your specific slide-out mechanism is the single most important first step in diagnosis. It turns a vague, overwhelming problem into a focused, manageable investigation.
Think about it this way: a common failure on a rack and pinion system is the shear pin. It's a tiny part designed to break under too much stress to protect the expensive motor. That’s a simple, cheap fix. On a cable system, a similar "stuck" symptom could mean a stretched cable, which is a much bigger and more frustrating repair. By identifying your system from the start, you save yourself time, stress, and a good bit of cash.
Your Essential Preventive Maintenance Checklist
The single best way to deal with RV slide out problems is to make sure they never happen in the first place. A little preventive care goes a seriously long way, saving you from the headache of a stuck slide and the gut-punch of a massive repair bill. This is about more than just a quick spray of lubricant; it’s about a consistent routine that keeps every component of your slide system happy and healthy.
Trust me, an ounce of prevention is worth a pound of cure here. Spending a few minutes on maintenance every couple of months can head off the kind of slow-grinding wear and tear that leads to fried motors, stripped gears, and nasty water leaks. Think of this checklist as your roadmap to a reliable, trouble-free slide-out.
Clean and Lubricate All Moving Parts
This is the absolute cornerstone of slide-out care, but there's a right way and a wrong way to do it. Dirt, sand, and road grime are the mortal enemies of your slide mechanism, acting like sandpaper on the gears and tracks.
Before you even think about grabbing the lubricant, you have to get everything spotlessly clean.
- Wipe Down Tracks: Grab a rag with a mild degreaser and wipe down all the visible tracks and gear racks. Get all that built-up gunk off.
- Clear Out Debris: Use some compressed air or a stiff brush to blast leaves, twigs, and dirt out of the gear teeth.
- Apply Dry Lube: Once everything is clean and dry, apply a dry lubricant made specifically for RV slide-outs. Using a wet lubricant like grease or standard oil is a huge mistake—it just attracts more dirt and creates a gritty paste that actually speeds up wear.
A classic rookie mistake is over-lubricating. You're not greasing a tractor axle. A light, even coat is all you need. Piling it on can cause buildup that leads to the very friction you're trying to prevent.
Inspect and Condition Rubber Seals
Your slide-out seals are the only thing standing between your RV's interior and the elements. If they fail, you’re looking at water damage, which is hands-down one of the most destructive and expensive issues an RVer can face. UV rays and temperature swings cause the rubber to dry out, crack, and lose its flex.
Putting your seals on a regular inspection and conditioning schedule is non-negotiable.
- Clean the Seals First: Gently wipe them down with a simple soap and water solution to remove any surface dirt and residue.
- Inspect for Damage: Get up close and personal. Look for any cracks, tears, or spots where the seal is pulling away from the RV wall.
- Apply a Conditioner: Use a dedicated rubber seal conditioner to keep the rubber pliable and effective. Never, ever use a petroleum-based product like Vaseline or WD-40, as it will eat away at the seals over time.
This simple task is especially critical when you're getting your rig ready for storage. For a complete rundown, you can learn more about how to winterize an RV in our detailed guide.
#rv #rvlife #rvliving #rvlifestyle #rvrenovation #rvremodel
#rvtravel #rvcamping #rvadventures #ruralwifi #5gwifi
#5ginternet
Keep It Level and Check the Roof
Finally, let's talk about two of the most overlooked maintenance steps that are also two of the most critical. First, always make sure your RV is perfectly level before you even think about hitting the slide-out button. Operating a slide while the frame is twisted puts a ton of uneven strain on the whole mechanism. It’s a leading cause of motor burnout and gear damage.
Second, get in the habit of sweeping the top of your slide-out before you pull it in. It only takes a minute. Pinecones, small branches, and other debris can easily get dragged inside, damaging the roof membrane and tearing up your top seal. A quick check can prevent serious punctures and leaks down the road. It’s all about making these small things part of your regular routine.
How to Manually Override Your Slide Out
There's that dreaded moment: you hit the button, and your slide-out does… nothing. A dead motor can feel like a trip-ending disaster, but don't dial up an expensive mobile mechanic just yet. Almost every slide-out system is designed with a manual override, and knowing how to use it is a game-changer.
This one skill can turn a full-blown panic into a manageable hiccup. It's not overly technical, but it does demand a little patience and knowing exactly where to look. Your RV’s owner's manual is your best friend here—it will pinpoint the override location and walk you through the specific steps for your model.
Finding the Manual Override Access Point
The first step is a bit of a scavenger hunt. Manufacturers tuck these access points in all sorts of places depending on the RV’s design and the slide mechanism it uses.
Here are the usual suspects for where to look:
- On the Opposite Side: Check the exterior wall directly across from the slide-out. You’re looking for a small rubber plug or grommet that covers the access hole.
- In a Storage Bay: Pop open the storage compartments located right under the slide-out. It's common to find the motor and its override access mounted to the frame in there.
- Inside the RV: This is less common, but some manufacturers place the access point under a bed, deep inside a cabinet, or behind a removable panel.
Once you’ve located it, you should see the end of the motor shaft. It’ll typically have a hex nut or a pin ready to accept a crank or a wrench.
Your owner's manual is non-negotiable here. A rack and pinion system has a completely different override procedure than a hydraulic or Schwintek system. Trying to guess is a surefire way to cause even more damage.
Tools and the Retraction Process
You won’t need a complicated toolkit for this. Most systems require either a 3/4-inch socket wrench or a special hand crank that should have come with your RV. If that crank has gone missing over the years, a standard socket and ratchet will almost always do the trick.
Here’s the most important step before you start turning anything: you must disengage the motor's brake. Look for a small lever right on the motor itself. Flip it to release the brake. If you skip this, you’ll be fighting the motor’s gearing, and the slide won’t budge. You could even break something.
With the brake released, attach your wrench or crank and start turning. It's going to be slow going—you’re moving hundreds of pounds by hand, after all. Just be steady and smooth until the slide is completely tucked in.
Once it's fully retracted, don't forget the final, crucial safety step: re-engage the motor brake. This locks the slide securely in place so it doesn't shift while you're driving.
Common Questions About RV Slide Outs
Even if you're diligent with maintenance, RV slide out problems and questions are bound to pop up. It's just part of RV life. Knowing what to do in certain situations—and what those weird noises mean—can give you a ton of peace of mind on the road.
Let's tackle some of the most common questions we hear from fellow RVers about their slide-out systems. Getting straight answers demystifies these complex moving parts, helping you operate them with confidence and spot trouble before it turns into a trip-ruining headache.
Should My RV Be Level Before I Operate the Slide Out?
Yes. Always. This is probably the single most important rule of thumb for operating your slides.
When you extend or retract a slide-out on uneven ground, you put an incredible amount of uneven stress on the entire mechanism. The RV's frame can twist just enough to cause the slide box to bind in the opening. It’s a recipe for disaster.
This kind of strain is a leading cause of premature motor failure, stripped gears, and bent tracks. Seriously, take the extra minute to make sure your rig is stable and perfectly level before you even think about touching that slide-out button. It's a simple habit that can prevent thousands of dollars in damage down the line.
What Kind of Lubricant Should I Use on My Slide Out?
This is a great question because using the wrong product can actually do more harm than good. Your slide-out has two very different components that need their own specific type of care.
- For the Rubber Seals: You'll want a dedicated rubber seal conditioner or a silicone-based spray. The key here is to find a product that does not contain petroleum distillates. Petroleum products will dry out the rubber, causing it to crack and fall apart over time, leading to leaks.
- For the Metal Mechanism: When it comes to the gears and tracks on systems like the rack-and-pinion, a high-quality dry lube spray is your best friend. It does the job without leaving behind a sticky mess that attracts road grime, dust, and other gunk.
When in doubt, always crack open your owner's manual. The manufacturer will have specific recommendations, and some systems have very unique requirements.
Is a Clicking Noise Normal When My Slide Is Fully Extended?
For many electric slide-out systems, that clicking or ratcheting sound is not only normal, it’s a good thing! It's the sound of the clutch inside the motor doing its job to prevent over-extension. Think of it as the system's built-in safety net, telling you it has reached its limit and is protecting itself from damage.
What you don't want to hear are other noises. If you hear grinding, squealing, or loud popping sounds while the slide is moving, that's a red flag. Those sounds usually point to a problem, like debris stuck in the tracks or a gear that's about to fail, and you'll want to get it inspected right away.
Of course, slide-out issues aren't the only logistical challenge for RV owners. Finding a place to park a big rig, especially if you're dealing with a stuck slide, can be a real pain. If you're ever in a bind and looking for specialized truck and trailer parking in different cities, there are services that can help you find a spot.
#rv #rvlife #rvliving #rvlifestyle #rvrenovation #rvremodel
#rvtravel #rvcamping #rvadventures #ruralwifi #5gwifi
#5ginternet
A reliable slide-out needs a reliable power source, and a reliable remote work setup needs great internet. SwiftNet Wifi provides high-speed 5G internet perfect for RV travelers and rural residents, ensuring you stay connected wherever your adventures take you. Visit us at https://swiftnetwifi.com to find the right plan for your lifestyle.
#rv #rvlife #rvliving #rvlifestyle #rvrenovation #rvremodel
#rvtravel #rvcamping #rvadventures #ruralwifi #5gwifi
#5ginternet


