

To properly level an RV, you have to tackle it in two stages: first side-to-side with blocks under your tires, and then front-to-back using the tongue jack. This process is the key to stability, preventing damage to your appliances, and just being comfortable. But before you do anything, always chock your wheels for safety.
Why a Perfectly Level RV Matters

Before we get into the nuts and bolts of leveling your rig, let’s talk about why this is a non-negotiable step every single time you set up camp. An unlevel RV isn't just a minor annoyance; it's a real threat to your comfort, your RV's systems, and even its structural integrity. Think of it as laying a solid foundation for your home on wheels.
If you don't have a level base, you’ll notice the little things right away. Doors swing open by themselves or refuse to stay latched. You might feel like you're sleeping on a hill, which makes for a restless night. Even simple things like cooking become a chore when your eggs keep sliding to one side of the pan.
Protecting Your RV’s Core Systems
Beyond your own comfort, an uneven setup puts a ton of strain on your rig’s most important components. The most sensitive part is the absorption refrigerator, which is standard in most RVs. These fridges depend on gravity to properly circulate the fluids that keep them cool.
For an RV fridge to work right, it can't be tilted more than 6 degrees front-to-back or 3 degrees side-to-side. Pushing it past that limit can cause permanent damage, and that’s a very expensive fix.
This isn’t just a "what if" scenario. Some data suggests that up to 75% of RVers run into problems caused by improper leveling, from broken appliances to plumbing headaches. Getting your rig level is a crucial part of its upkeep and a fundamental skill when learning how to live in an RV full time.
Structural Stress and Long-Term Damage
Parking on a slant also puts uneven pressure on your RV's frame, slide-outs, and plumbing systems. Here’s a look at the damage it can cause over time:
- Slide-Out Strain: If you try to extend or retract a slide-out when your RV isn’t level, the mechanism can bind up. This can burn out the motor or chew up the gears and seals.
- Plumbing Problems: Your sinks, shower, and holding tanks are all designed to drain using gravity. A tilt can make water pool in the pipes, leading to slow drains and wonky sensor readings in your tanks.
- Frame Integrity: Over the long haul, uneven weight distribution puts constant stress on the chassis. This can eventually lead to serious structural problems down the road.
Taking a few extra minutes to get perfectly level is one of the smartest preventative maintenance tasks you can do. It protects your investment and helps make sure every trip is as smooth and enjoyable as possible.
Your Essential RV Leveling Toolkit
There's a massive difference between a frustrating hour of guesswork and a quick, five-minute setup. The secret? Having the right equipment. When you assemble a reliable RV leveling toolkit, you’re ready for any campsite, turning a potential headache into a simple part of your arrival routine.
This isn’t about buying the most expensive gear on the shelf; it's about having the right gear that gets the job done reliably, every single time.
Levels The Foundation of Accuracy
The cornerstone of your entire kit is a dependable level. Without one, you’re just flying blind. You’ve got a few options here, and each one has its place.
Plenty of RVs come with those little bubble levels stuck to the outside, which are handy for a quick glance. But for real accuracy, nothing beats a long carpenter's level (think 2-4 feet) placed right on the floor inside your RV. It gives a much more honest reading of what's happening.
If you want to get a bit more modern, a digital level or even a smartphone app can give you precise measurements down to the degree.
Pro Tip: Don't just trust one spot inside your rig. I always check in a few different places—the floor of the freezer is a great one, or on a kitchen countertop—to confirm the reading before I start making any adjustments.
Leveling Blocks Building Your Base
Once you know which side is low, you need a way to bring it up. This is where your leveling blocks come into play. You’ll place these under the tires on the low side to lift the RV.
- Plastic Stacker Blocks: These are probably the most common choice you’ll see at the campground. Brands like Lynx Levelers offer interlocking blocks that are lightweight, tough as nails, and easy to store. You just stack them like LEGOs to build up to the exact height you need.
- DIY Wood Blocks: For a more budget-friendly approach, you can cut your own from sturdy pieces of wood, like 2x8s or 2x10s. They're heavier and can eventually rot if they stay wet, but they are incredibly strong and work just as well.
- Curved Levelers: These are basically big plastic ramps. You just drive up onto them until your rig is perfectly level, then you slide a matching chock underneath to lock it in place. Simple and effective.
RV Leveling Tools Comparison
To help you get started, here's a quick look at the most common leveling tools. This should give you a good idea of what might work best for your setup and budget.
| Tool | Best For | Key Feature | Price Range |
|---|---|---|---|
| Carpenter's Level | Unbeatable accuracy for interior checks | Long, stable base for a true reading | $15 - $40 |
| Plastic Stacker Blocks | Versatility and ease of use | Interlocking design for custom height | $30 - $60 |
| Curved Levelers | Speed and simplicity | Drive-on, single-piece design | $40 - $80 |
| DIY Wood Blocks | Budget-conscious RVers | Extremely durable and low-cost | $10 - $20 (DIY) |
| Wheel Chocks | Every RVer, without exception | Prevents dangerous rolling | $20 - $50 |
Ultimately, the best tools are the ones you'll actually use. I personally carry a set of stacker blocks and a trusty 2-foot level—it's a combo that has never let me down.
Non-Negotiable Safety and Stability Gear
Alright, let's talk about the gear that is absolutely critical for doing this safely.
First up, wheel chocks. This is non-negotiable. You must place them against the tires on the side you are not raising to keep the RV from rolling an inch while you work. Always chock your wheels before you even think about unhitching.
The final piece of the puzzle is your stabilizing jacks. Here’s the most important thing to remember: they are for stability, not for lifting. Once your RV is perfectly level side-to-side and front-to-back, then you deploy these jacks to stop the rig from rocking and bouncing when you walk around inside. Trying to use them to level your RV is a surefire way to damage the jacks or, even worse, the frame of your rig.
A Practical Guide to Manual Leveling
Alright, this is where the rubber meets the road—or in this case, the blocks. Don't sweat it, though. Once you get a repeatable process down, manually leveling your rig becomes a quick, satisfying part of setting up camp. The real goal is to nail it on the first try and avoid that frustrating back-and-forth dance of pulling forward and backing up again. It all starts the second you pull into your spot.
Before you even touch a block or jack, take a good look at your campsite. Scout out the most level patch of ground you can find. Sometimes, just shifting your rig a few feet forward or back can make a huge difference and save you a ton of work.
This visual gives you a great overview of the essential tools you'll need for a smooth manual leveling job.
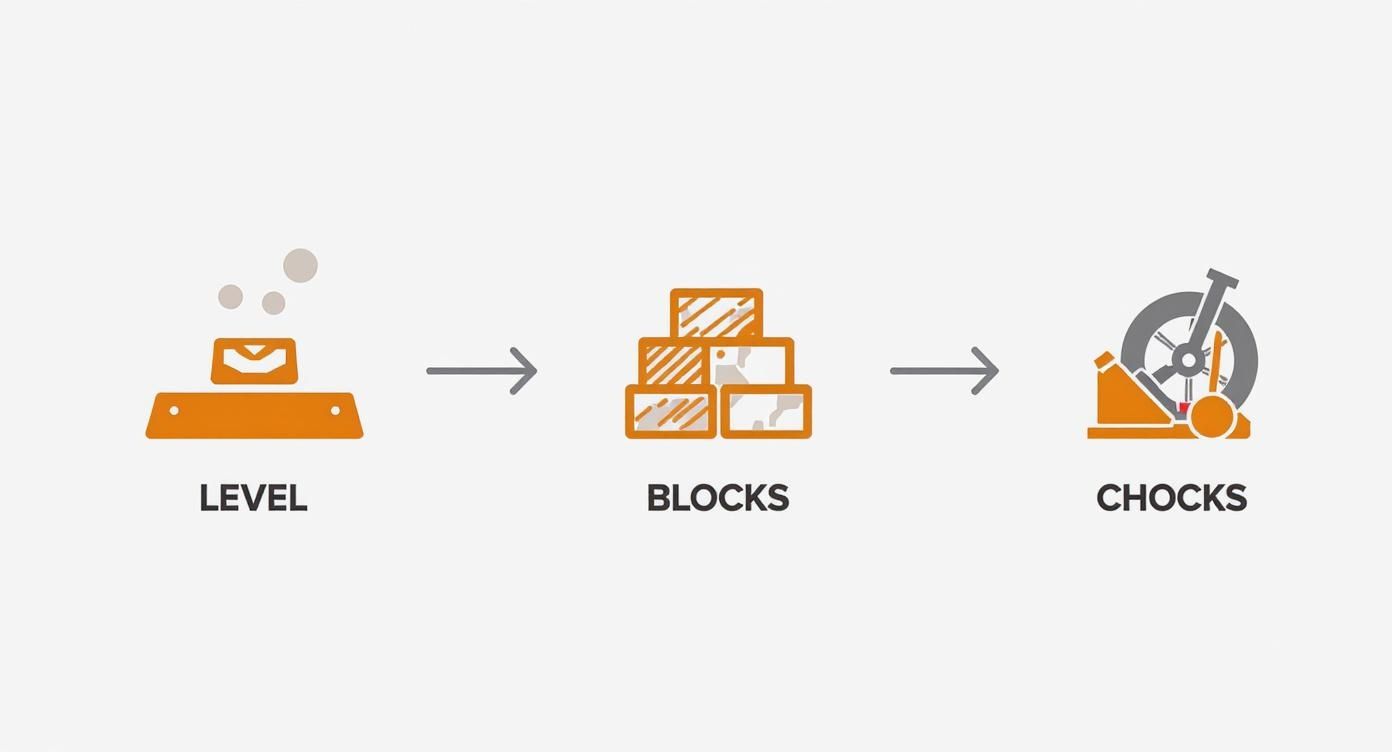
As you can see, having your level, blocks, and chocks ready to go is the key to an efficient setup.
Tackling Side-to-Side Leveling First
Your first job is always getting level from side to side. This is the adjustment you have to make with blocks under your tires before you unhitch from your tow vehicle. Once you’ve parked the RV where you want it, pop a carpenter's level on the floor just inside the main door to see which side is sitting low.
Next, you'll need to guess how many blocks to use. A pretty solid rule of thumb is that one standard 1-inch plastic leveling block will raise that side by about an inch. If your bubble level is about halfway off the center line, you're probably looking at one or two blocks.
Go ahead and place the blocks in front of the tire (or both tires on a dual-axle trailer) on the low side, creating a little ramp. If you're curious about how these basic leveling principles apply to other big rigs, this guide on how to level a shipping container has some surprisingly relevant insights.
Pro Tip: Always, always use a spotter when you're backing onto your blocks. It’s practically impossible to see them from the driver's seat. Have your helper stand where you can clearly see them and guide you back slowly until the axle is centered right over the stack.
Once you’re up on the blocks, check your level again. If it's spot-on, immediately place your wheel chocks snugly against the tires on the side you did not lift. This is a non-negotiable safety step to prevent any possibility of rolling. Only after those chocks are secure should you unhitch.
Nailing the Front-to-Back Adjustment
With the side-to-side axis handled and the trailer unhitched, leveling from front to back is the easy part. This step relies completely on your tongue jack.
Grab your level and place it inside the RV again, but turn it so it measures the front-to-back slope this time. From there, just use your tongue jack to raise or lower the front of the trailer until that bubble is perfectly centered. For a fifth wheel, you'll be using the front landing gear to do the exact same thing.
The trick here is to make small, deliberate adjustments. A common mistake is to overcorrect and end up chasing the bubble back and forth. A few slow, steady cranks on the jack are usually all it takes to get it just right.
Final Checks Before You Relax
Before you even think about putting out your slide-outs or stabilizers, do one last walkthrough. Make sure everything feels solid and even. A good test is to see if your doors open and close without swinging one way or the other on their own.
- Confirm Level: Give that bubble level one final glance.
- Check Chocks: Make sure your wheel chocks are still tight against the tires.
- Verify Jack Position: Ensure your tongue jack is on a solid base, like a jack block, especially if you’re on soft ground like sand or gravel.
Once you’re happy with it, you can deploy your stabilizing jacks. Just remember, their job is only to stop the rig from bouncing and swaying as you move around inside. They should just make firm contact with the ground—never try to use them to lift or support the RV's weight. Now you’re officially level and ready to kick back and enjoy your campsite.
Mastering Automatic Leveling Systems
If you've got a modern rig, an automatic leveling system can feel like pure magic. What used to be a hands-on chore is now just the push of a button. But as slick as these systems are, they're not infallible. Knowing what’s happening behind the scenes is the key to using them correctly and fixing the occasional hiccup.
These systems, whether they're hydraulic or electric, rely on a central control unit that acts as the brain. This unit gets its information from a level sensor. When you hit that "Auto-Level" button, the brain tells the jacks when and how far to extend, following a specific sequence until your RV is perfectly stable. The process has become incredibly smooth, a direct result of the RV industry's focus on making life on the road easier.
We've come a long way. Electronic and sensor-based systems really started taking off in the early 2010s. Today, they're everywhere. In fact, North America absolutely dominates the RV leveling sensor market with a 43% share in 2024. That reflects a huge preference for this kind of tech among the 11 million households in the U.S. that own an RV. If you want to geek out, you can explore more data on the RV leveling sensor market to see just how common this technology is now.
The Correct Auto-Leveling Procedure
Even with all that automation, you can't just press the button and walk away. There's a right way to do it that ensures the system works safely and doesn't put unnecessary strain on your jacks or the RV’s frame. A little prep goes a long way.
Before you even think about powering on the system, run through this quick checklist:
- Find the Flattest Spot: It sounds obvious, but start by parking on the most level ground you can find. This gives your system a much easier starting point and prevents it from having to extend the jacks to their absolute limits.
- Use Jack Pads: This is non-negotiable. Always place sturdy jack pads or blocks under each jack foot before you start. On soft ground like dirt, grass, or hot asphalt, this prevents the jacks from sinking in and creating a wobbly, unstable base.
- Chock Your Wheels: Even with an automatic system, always chock your wheels. It's a simple safety step that guarantees your rig isn't going anywhere during the leveling process.
Once your prep work is done, you can fire up the system and hit "Auto-Level." Most systems will lower the front jacks first, then the rear, making tiny, precise adjustments until that internal sensor gives the all-clear.
When to Use a Manual Override
Automatic systems are fantastic, but they're not miracle workers. They can get confused, and there are times when you'll need to step in and take manual control. Knowing when—and how—to do this is a skill every RVer should have.
One classic scenario is parking on extremely uneven ground. If a campsite has a gnarly slope, the auto-level feature might struggle or even throw an error code because a jack has to extend too far. When this happens, use the manual controls to lower the jacks on the low side first. You can even use extra blocks under those jacks for more height before letting the auto-function take over for the fine-tuning.
Soft terrain is another time to go manual. To keep the jacks from digging themselves a hole, you can manually lower them until they make solid contact with your jack pads. This creates a firm foundation before you start the auto-level cycle. Take a few minutes to read your system’s manual—understanding its specific override process will save you a lot of headaches down the road.
Common Leveling Mistakes to Avoid
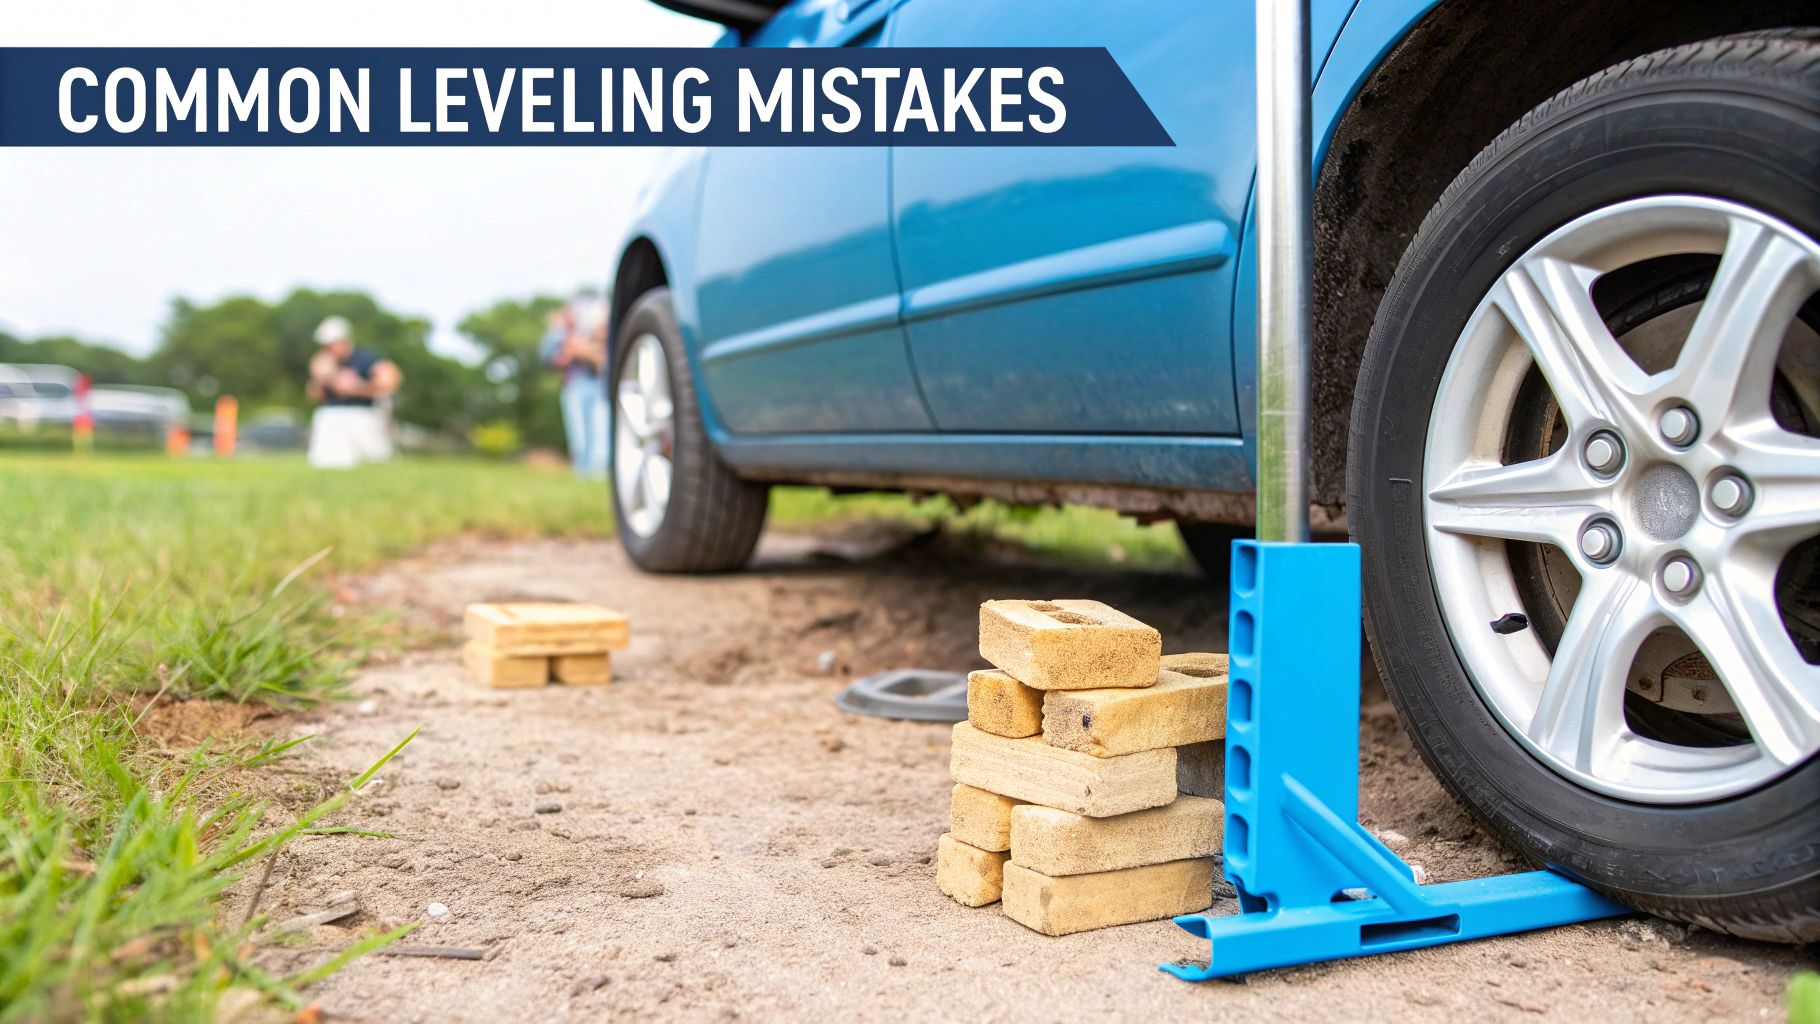
Even seasoned RVers sometimes fall into bad habits or make a simple slip-up when setting up camp. Knowing the right way to level your rig is only half the battle; knowing what not to do is just as critical. Sidestepping these common blunders will save you a world of frustration, prevent damage, and keep you from having to start the whole process over again.
One of the easiest—and most dangerous—mistakes is forgetting to chock the wheels before you do anything else. It’s a small, quick step, but skipping it is a huge safety gamble. Those chocks are the only thing stopping your rig from rolling while you’re unhitching or lifting one side with jacks. It's a situation that can get out of hand in a heartbeat.
Another classic error is trying to level the RV after putting the slide-outs. Your slides can add thousands of pounds of weight, and it's rarely distributed evenly. When you level with them already out, you're putting a ton of strain on the slide mechanisms and the RV frame itself, and the final result won't even be accurate.
Misunderstanding Your Equipment
A critical distinction many new RVers get wrong is the difference between leveling jacks and stabilizing jacks. This isn't just about using the right words; mixing them up can lead to some seriously expensive repairs.
- Leveling Jacks: Think of these as the heavy lifters. They're robust hydraulic or electric jacks built to lift and hold the entire weight of your RV. They're the muscle behind any automatic leveling system.
- Stabilizing Jacks: These are the lightweights. Their only job is to stop the RV from rocking and swaying once it's already level. They cannot support the rig's weight.
Trying to lift your RV with its stabilizers is a surefire way to bend the jack screws, fry their motors, or even twist the frame of your coach. Always get the rig level first, then deploy the stabilizers to firm things up.
It's also pretty common to over-extend your jacks, especially on a site with a dramatic slope. Once a jack hits its maximum extension, it can throw an error code on an auto-level system or just stop lifting altogether. The right move here is to retract the jacks, stack more blocks under the jack pads to give them a boost, and then run the leveling sequence again.
Procedural and Environmental Oversights
Beyond the gear itself, a few other missteps can trip you up. A big one is not accounting for soft ground. Placing your jacks or blocks directly on soft dirt, hot asphalt, or soggy grass is just asking for them to sink. As the ground shifts, your perfectly level RV will slowly tilt all over again. Always use sturdy jack pads or wide blocks to spread that weight out.
Little oversights can affect your comfort, too. An unlevel rig doesn't just feel off-balance; it can mess with how your appliances work. For instance, if your RV air conditioner seems to be struggling on a blistering day, being off-kilter could be hindering proper drainage and tanking its efficiency. If you run into issues, our guide on RV air conditioner repair has some extra tips that might help.
Finally, don't put all your trust in that tiny, built-in bubble level. For a truly accurate reading, grab a longer carpenter's level and place it on the floor right in the middle of your main living space. Some people even put it in the freezer, since that's one of the most level surfaces in the rig. This gives you a much better feel for how things are actually sitting, ensuring a solid, comfortable stay.
Your Top RV Leveling Questions, Answered
Even after you've leveled your RV a dozen times, questions still pop up at the campsite. I’ve been there. Getting a straight answer can be the difference between kicking back with a cold drink and spending an hour messing with blocks in the fading light. Let’s tackle some of the most common things people ask.
Of course, none of this matters if you don't have a decent spot to begin with. Before you even think about pulling out the level, you need a safe place to park. In new territory, resources for finding suitable truck and trailer parking can be a real lifesaver.
How Perfectly Level Does My RV Need to Be?
This is the big one, and the real answer comes in two parts: one for you, and one for your appliances.
For your own comfort, "close enough" is usually fine. If you aren't fighting gravity to stay in bed and your morning coffee isn't sliding off the counter, you're probably good to go.
Your absorption refrigerator, however, is a lot pickier. For it to work right, your rig can't be off by more than 3 degrees from side to side or 6 degrees from front to back. A super easy way to check this is to just pop a small bubble level inside your freezer. If the bubble is happy between the lines, your fridge will be too.
A perfectly level RV isn't just about feeling balanced. It's about ensuring your appliances function correctly, your plumbing drains properly, and you aren't putting unnecessary long-term stress on the rig's frame and slide-outs.
Can I Use Stabilizer Jacks to Level My RV?
Let me be crystal clear on this one: absolutely not. If you take away one thing from this article, let it be this. Stabilizer jacks are only there to stop the RV from rocking and swaying after it’s already been leveled with blocks or ramps.
They are simply not designed to bear the full weight of your RV. Trying to lift a corner with a stabilizer jack is a fast track to bending the jack, burning out its motor, or even worse, damaging the actual frame of your rig. Level first, then stabilize. Always.
What if My Automatic Leveling System Fails?
First off, don't panic. It happens to the best of us, usually at the most inconvenient time. Your first move should be to grab the owner's manual and look up the troubleshooting guide. More often than not, it's something simple like low battery voltage or a control panel that just needs a quick reset.
Every auto-leveling system has a manual override procedure, which usually involves a special drill bit or a hand crank. Take it from me, you want to learn how to do this in your driveway on a sunny afternoon, not in a muddy campsite during a downpour. Knowing this process is just as critical as knowing how to winterize RV systems before the first freeze.
At SwiftNet Wifi, we know that a smooth, stable setup is the foundation of any great RV trip. Just as a level rig keeps you comfortable, our reliable 5G internet service keeps you connected, no matter where your adventures take you. Learn more at https://swiftnetwifi.com and stay connected on the road.
#rv #rvlife #rvliving #rvlifestyle #rvrenovation #rvremodel
#rvtravel #rvcamping #rvadventures #ruralwifi #5gwifi
#5ginternet


