

Ever found yourself stuck trying to email a massive project deck or just desperate to free up some space on your hard drive? Learning how to compress large files is the magic trick you need. It turns those bulky files into neat, smaller packages by smartly finding and cutting out digital fluff, making them a breeze to store and share.
Why Bother Compressing Files Anymore?
With super-fast internet and giant storage drives becoming the norm, you might think shrinking files is a thing of the past. But here's the thing: it's more important than ever.
We're all creating and sharing massive amounts of data—high-res photos, 4K videos, you name it. This digital avalanche makes managing our storage and sending files a real headache. In fact, the global market for file compression software was valued at a whopping USD 1.5 billion in 2023 and is expected to keep climbing. That's not just a random number; it shows a real, growing need for smarter data management.
When You’ll Actually Use It
Think about the last time you tried to send a bunch of vacation photos to your family. Most email services tap out at around 25MB for attachments. Compression lets you bundle all those pictures into one smaller file that sails through without a problem.
Here are a few other times it comes in handy:
- Archiving Old Projects: Once a big work project wraps up, compressing the whole folder cleans up your active workspace but keeps everything safe and sound in a tidy archive.
- Freeing Up Device Space: Your phone and laptop can only hold so much. Compressing old videos, photos, and documents can instantly free up gigabytes.
- Speeding Up Transfers: Smaller files mean quicker uploads and downloads. This is a game-changer if you’re on a limited data plan or stuck with slow internet. If you're conscious of your data cap, learning how to reduce data usage goes hand-in-hand with compression.
The real win with compression isn't just about saving space. It's about saving time and making your digital life smoother. It just streamlines how you handle your information.
More Than Just Making Things Smaller
Compression is a cornerstone of efficient data transfer, especially when you need to move large amounts of data across networks without bogging everything down.
At the end of the day, getting the hang of file compression is a fundamental skill. Whether you're a student, a creative pro, or working from home, it’s a simple way to keep your digital world organized and running efficiently.
Choosing Your Compression Method: Lossy vs Lossless
Before you shrink that massive file, you’ve got a critical decision to make. It’s not just about making a file smaller; it’s about what you’re willing to trade for that extra space. The two paths you can take are known as Lossy and Lossless compression.
Getting this right is the key to avoiding frustrating mistakes, like accidentally butchering the quality of an important photo or using a clumsy, inefficient method for your media files. Each approach has its place, and picking the right one is the first real step to mastering file compression.
What Is Lossless Compression?
Think of lossless compression as the ultimate space-saver that doesn't throw anything away. It cleverly finds repetitive data in your file, packs it down tightly for transport or storage, and then perfectly reconstructs it when you open it again. Not a single bit of information is lost.
This method is the only option for files where absolute, pixel-perfect integrity is non-negotiable.
- Text Documents and Spreadsheets: For a contract or financial report, losing even a single comma or number could be disastrous.
- Source Code: Programmers rely on lossless because one out-of-place semicolon can crash an entire application. There's no room for error.
- Certain Image Formats: This is why designers love PNG files. They use lossless compression to keep logos, text, and graphics perfectly crisp.
The most common lossless formats you'll run into are ZIP, RAR, 7z, and PNG. They are your go-to whenever the original file has to be restored exactly as it was.
When to Use Lossy Compression
Lossy compression is the more aggressive, pragmatic sibling. It achieves massive file size reductions by permanently throwing out data that our eyes and ears are unlikely to miss. It's like an audio engineer cutting out frequencies only a dog could hear—you get a much smaller file without a noticeable drop in quality.
This makes it the hands-down winner for media files, where a tiny, often imperceptible quality dip is a fantastic trade-off for a file that's dramatically easier to handle. That 10-minute 4K video that’s several gigabytes? A lossy version might be a few hundred megabytes and still look stunning on your screen.
Lossy compression is all about smart sacrifices. It intelligently removes non-essential information to give you the smallest possible file, making it perfect for streaming, sharing, and storing large media libraries.
Popular lossy formats are everywhere: JPEG for photos, MP3 for music, and MP4 for video. The demand for both methods is exploding, with the global data compression software market projected to hit USD 2.15 billion by 2032. This growth is fueled by our constant need to store and send huge amounts of data, a trend driven by industry giants like Adobe and WinZip. You can learn more about the growth of data compression software to see where the market is headed.
Lossy vs Lossless Compression At a Glance
Still not sure which to choose? This table breaks down the core differences to help you decide which method is the right tool for the job.
| Feature | Lossless Compression | Lossy Compression |
|---|---|---|
| Data Integrity | Preserves all original data. A perfect copy. | Permanently removes some "non-essential" data. |
| File Size Reduction | Moderate reduction (typically 20-50%). | Significant reduction (can be up to 90%). |
| Best For | Text, source code, executables, spreadsheets. | Photos, videos, audio files. |
| Common Formats | ZIP, RAR, 7z, PNG, FLAC | JPEG, MP3, MP4, GIF |
| Primary Goal | Perfect reconstruction. | Smallest possible file size. |
Ultimately, the choice comes down to your priority: do you need a perfect replica of the original, or is a much smaller file size more important?
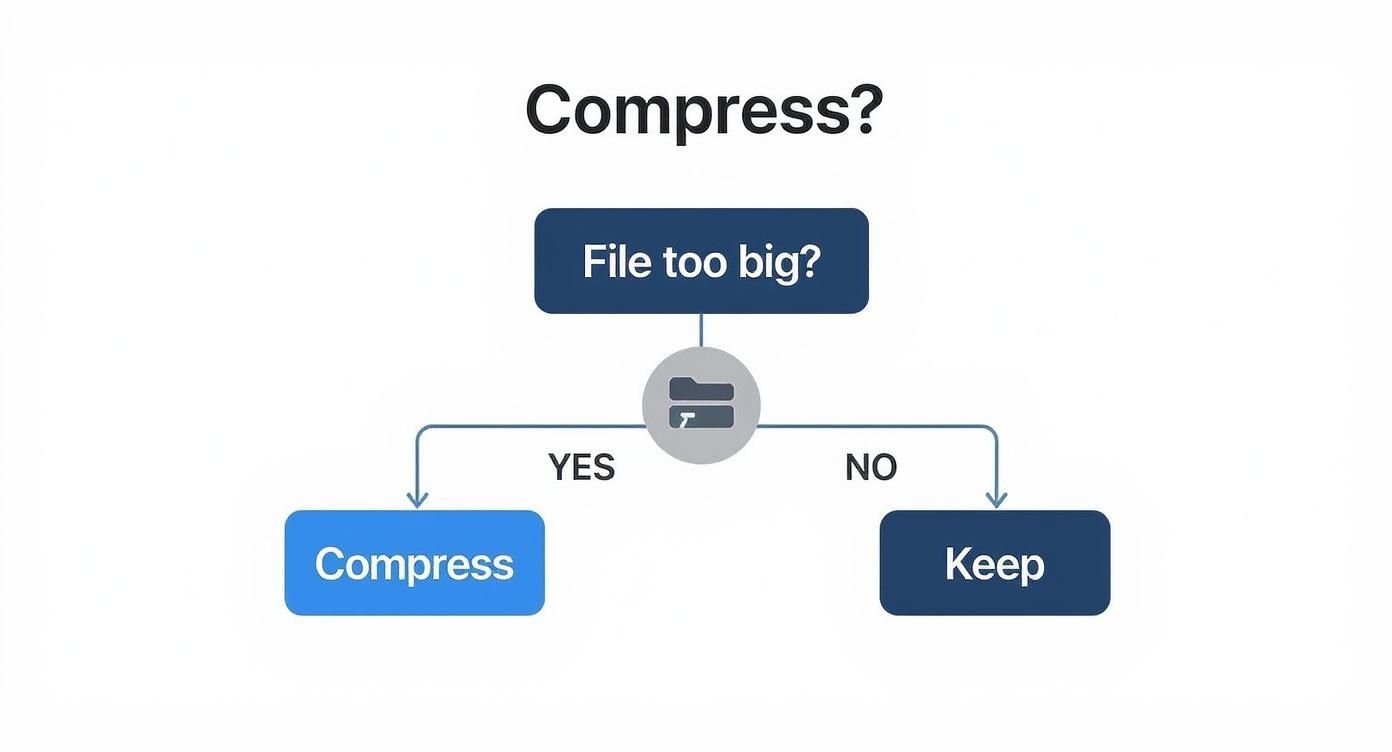
This simple chart reinforces the core idea of file management: if a file is too big for what you need to do with it, compression is your next logical move.
Using Your Computer's Built-In Compression Tools
You don't always need to download fancy software to shrink down your files. In fact, both Windows and macOS come with surprisingly capable compression tools baked right into the operating system.
These native utilities are my go-to for everyday tasks. They're quick, easy, and often the fastest way to get the job done without any fuss.
The best part? They create universally compatible .ZIP archives. A ZIP file you make on your computer can be opened by pretty much anyone on any machine, which is why it has become the gold standard for sharing.
Compressing Files on Windows
If you're on a Windows PC, the whole process is woven directly into File Explorer. No need to open a separate program.
Let’s say you have a folder packed with photos from a recent trip that you want to email to your family. Here’s how you do it:
- Select Your Files: First, open File Explorer and find your folder. You can click a single file, hold the Ctrl key to click and select multiple files, or just select the entire folder.
- Right-Click and Send: With your files highlighted, give them a right-click to pop open the context menu.
- Choose the Destination: From that menu, hover your mouse over the 'Send to' option. A little submenu will appear—just click on 'Compressed (zipped) folder'.
And that's it! Windows instantly creates a new .ZIP archive right there in the same location. It’ll be named after one of the files you selected, ready for you to rename and send off.
Compressing Files on macOS
For all the Mac users out there, the experience is just as seamless using the Finder. Imagine you need to package a few large project documents to send over to a client.
- Locate in Finder: Just navigate to the files or the folder you want to compress.
- Right-Click and Compress: Select your item(s), then right-click (or hold Control and click) to bring up the action menu.
- Select 'Compress': Simply choose the 'Compress' option from the list.
macOS will immediately create an 'Archive.zip' file (or a named archive if you only zipped one item). This file is now ready to attach to an email or upload to a cloud service.
These built-in tools are fantastic for quick, no-fuss compression. They're perfect for bundling up documents, archiving small project folders, and prepping files for email when all you need is a simple, universally accepted ZIP file.
Knowing the Limitations
While incredibly convenient, these native tools aren't the answer for everything. They primarily create standard ZIP files and don't have the advanced features you might need for more serious compression jobs.
You'll find they come up short if you need to:
- Create different archive formats like RAR or 7z for maximum space saving.
- Split a truly massive file into smaller, more manageable chunks.
- Password-protect an archive containing sensitive information.
For those kinds of situations, you'll want to look at dedicated third-party software. But for most of what you'll do day-to-day, the tools already on your computer are more than enough to get the job done.
Unlocking Advanced Compression with Dedicated Software
When the built-in compression tools on your computer just aren't cutting it, it’s time to call in the specialists.
Dedicated software like 7-Zip and WinRAR are the heavy lifters of the compression world. They give you a level of control and power that goes far beyond simply creating a standard ZIP file. Think of them as the pro-grade option for when you really need to shrink something down.
These programs are designed for situations where you need more than just a smaller file. They offer features like enhanced compression ratios, robust security options, and the ability to handle truly gigantic files with ease. For anyone who regularly deals with large datasets, high-resolution media, or sensitive information, figuring out how to compress large files with these tools is a game-changer.
The image above shows the no-nonsense interface of 7-Zip, a wildly popular and powerful open-source tool. You can see all the different archive formats it supports, including its own native .7z format, which is famous for its incredible compression.
Choosing the Right Format
One of the biggest advantages of dedicated software is the choice of archive formats. While you can still create standard ZIP files for universal compatibility, you also gain access to more powerful, specialized options.
- .RAR Format: Developed for WinRAR, the .RAR format often provides better compression than a standard ZIP. It also supports neat features like recovery records, which can actually help repair a damaged or corrupted archive.
- .7z Format: This is the native format for 7-Zip and frequently offers the highest compression ratio you can get. If your absolute top priority is the smallest possible file size for archival or sending, .7z is usually the winner.
The main trade-off here is compatibility. To open a .RAR or .7z file, the person on the other end will likely need the corresponding software (WinRAR or 7-Zip) installed. It's a small hurdle, but something to keep in mind.
Popular Compression Tools Compared
Navigating the world of third-party compression software can be a bit overwhelming. To simplify things, here's a quick comparison of the most popular tools and what they're best suited for.
| Tool | Key Features | Best For |
|---|---|---|
| 7-Zip | - Open-source and completely free - Highest compression with .7z format - Supports AES-256 encryption |
Users who want the absolute smallest file sizes and don't need a fancy interface. It's a pure workhorse. |
| WinRAR | - Excellent compression with .RAR format - Archive repair capabilities - Integrated password manager |
Professionals and users who need robust features like archive recovery for important files. |
| WinZip | - User-friendly interface - Direct cloud integration (Dropbox, Google Drive) - PDF conversion and watermarking |
Beginners or users who value ease of use and seamless integration with cloud storage services. |
Each of these tools has its own strengths. 7-Zip is fantastic for raw power and cost-effectiveness, while WinRAR and WinZip offer more polished experiences with unique features that might be worth the price depending on your needs.
Practical Scenarios for Advanced Tools
These features aren't just for tech experts; they solve real-world problems all the time, especially for people managing large files while traveling or living in rural areas with spotty internet.
Imagine you're an RV traveler who just finished editing a 10GB 4K video of your latest adventure. Uploading a file that size over a mobile hotspot is a recipe for frustration. It could take hours, if it even works at all.
This is where file splitting becomes a lifesaver. With a tool like 7-Zip or WinRAR, you can break that massive 10GB archive into ten smaller 1GB parts. Uploading each smaller chunk is far more manageable and much less likely to fail. It’s an incredibly practical solution for anyone battling limited bandwidth.
Another essential feature is password protection. If you need to send sensitive client files or personal financial documents, you can encrypt the archive with a strong password. This adds a crucial layer of security, ensuring that even if the file is intercepted, its contents remain completely unreadable.
From splitting huge video projects to securing confidential data, these advanced tools provide the flexibility you need to manage any file, no matter how large or important.
Pre-Optimizing Files for Maximum Compression
The best way to shrink a massive file often starts before you even think about hitting "compress." I've learned from years of juggling hefty project files that a little prep work up front—what I call pre-optimizing—can make a huge difference in the final compressed size.
Think of it like tidying a room before you pack everything into boxes. It just makes the whole process smoother and way more efficient. By trimming the fat off your files first, you give your compression software a running start, leading to the smallest, most manageable archive possible.
Prepping Different File Types
How you pre-optimize really depends on what you're working with. A raw 4K video file carries a different kind of "digital weight" than, say, a huge photo album or a complex PDF. Each needs a slightly different touch.
For media-heavy projects, a few simple tweaks can lead to some seriously big savings:
- Images: Got a folder packed with high-res photos? Run them through a batch-resizer before you zip them up. A 5MB professional photo might look perfectly fine for web sharing at just 1MB. Tools like Adobe Photoshop have this built-in, but there are plenty of free online editors that can resize hundreds of images at once.
- Videos: That gorgeous 4K video clip is an absolute data hog. Just by downscaling it to 1080p using a video converter, you can slash its size by over 75%. For most viewers, the difference in quality is barely noticeable. As a bonus, smaller video files also help reduce buffering and streaming issues for whoever you're sending it to.
- Documents: For PDFs, most reader apps like Adobe Acrobat have a "Reduce File Size" or "Optimize PDF" command hidden in the menus. This little function is a lifesaver—it strips out bulky embedded fonts, compresses the images inside the document, and clears out other junk metadata you don't need.
Part of this whole process is just getting a handle on what's taking up so much space in the first place. There are great strategies to track and manage large files on your Mac that can help you pinpoint the biggest offenders before you even start.
Why This Matters for Modern Data
This kind of prep work is becoming more important every day. Take the explosion of Internet of Things (IoT) devices, for example. The number of global IoT connections was already at 13.2 billion back in 2022 and is expected to jump to a staggering 34.7 billion by 2028.
All those little devices are constantly sending and receiving information, and they rely on super-efficient compression to keep networks from grinding to a halt.
By taking a few moments to pre-optimize, you’re working smarter, not harder. You’re removing the low-hanging fruit of file bloat, which allows the compression algorithm to focus on the truly complex data, resulting in a significantly smaller final archive.
At the end of the day, whether you're sending a final project to a client or just backing up your own photos, these extra steps pay off. You’ll save storage space, cut down on upload times, and make sharing big files a smoother experience for everyone involved.
Common Questions About File Compression
When you start digging into how to compress large files, a few questions always seem to pop up. It’s really easy to get tangled up in the details of different formats, quality loss, and file size limits. Let's walk through some of the most common points of confusion so you can compress your files with confidence.
Most people first get tripped up by the different compression methods and what the real-world trade-offs are.
Does Compressing a File Reduce Its Quality?
This is easily the most frequent question, and the answer is a classic "it depends" on the method you're using.
- Lossless Compression (ZIP, RAR, 7z): This method does not reduce quality one bit. Think of it like a perfect vacuum seal for your data; when you decompress the file, it's identical to the original. This is absolutely essential for things like documents, software, and spreadsheets where every single piece of data is critical.
- Lossy Compression (JPEG, MP3, MP4): This approach, on the other hand, does permanently remove some data to make the file size dramatically smaller. The trick is that it’s designed to discard information our eyes and ears probably won't miss anyway. So while there is technically quality loss, it's often impossible to notice. This is the standard for photos, music, and videos.
Bottom line: if you're archiving a critical project, go lossless. If you're just sharing a vacation video with family, lossy is your best friend.
What Is the Best Format to Use: ZIP, RAR, or 7z?
Choosing the right archive format usually comes down to a balancing act between compatibility and raw compression power.
For maximum compatibility, ZIP is the undisputed champion. A .zip file can be opened on pretty much any computer out there, no special software needed. It’s the perfect, safe choice for sending files to people when you have no idea what programs they have installed.
But, if your only goal is to shrink a file down to its absolute smallest size, 7z almost always provides the best compression ratio. The catch is that the person on the other end will need software like 7-Zip to open it. RAR is a fantastic middle-ground, often giving you better compression than ZIP and throwing in handy features like archive recovery.
My personal rule of thumb: Use ZIP for universal sharing with anyone and everyone. Use 7z for my own personal archives to save the most space.
Can I Compress an Already Compressed File?
You technically can, but it’s almost always a complete waste of time. Files like JPEGs, MP3s, and MP4s are already heavily compressed using those lossy methods we talked about earlier.
Trying to zip an already-compressed file will usually give you a tiny, almost unnoticeable size reduction. In some cases, the extra data needed for the new archive format can even make the file slightly larger. You'll get much better results by optimizing the original media file before you compress it for the first time.
My Compressed File Is Still Too Big for Email. What Do I Do?
This is a classic problem. You've zipped up your folder, but it's still way over your email provider's typical 25MB limit. Don't worry, there are a few simple ways around this.
First off, forget about sending it as a direct attachment. Your best bet is to use a cloud storage service.
- Upload your large compressed file to a service like Google Drive, Dropbox, or WeTransfer.
- Once it’s uploaded, just generate a shareable link to the file.
- Email that simple link to your recipient. They can click it and download the file directly whenever it's convenient for them.
This method isn't just for bypassing size limits; it's also more reliable for large files, especially if your recipient has slow internet. A faster connection always makes big downloads less of a headache. For a deeper dive on that, check out our guide on how to increase upload speed with easy tips for faster internet.
As another option, more advanced tools like 7-Zip have a built-in feature that lets you split one huge archive into several smaller "parts," which you can then send in separate emails.
At SwiftNet Wifi, we know that managing large files is a daily reality, especially when you're working remotely or traveling. Having fast, reliable internet makes all the difference, turning frustrating uploads into a quick task. Check out our high-speed 5G internet solutions perfect for rural areas and RV life at https://swiftnetwifi.com.
#rv #rvlife #rvliving #rvlifestyle #rvrenovation #rvremodel
#rvtravel #rvcamping #rvadventures #ruralwifi #5gwifi
#5ginternet


