

The trailer is packed, the hookups are disconnected, and everyone's ready to leave. Then you notice a soft-looking tire, wonder whether the battery charged, and realize nobody checked how much water is still in the tanks. The most useful must haves for travel trailers aren't the accessories that make camp look finished. They're the equipment, information, and routines that help you leave the driveway prepared.
Preparing Your Travel Trailer for the Road
A departure-day walkaround can expose a gap that a shopping list misses. You might have comfortable chairs and a well-stocked kitchen but no reliable tire-pressure gauge. Or you might have a solar panel without knowing whether the battery can support the equipment you'll use after sunset.
Treat the trailer as a collection of connected systems, not separate purchases. A practical way to organize them is road safety, residential infrastructure, power, connectivity, and comfort with storage. Each purchase should support one of those systems without overloading another.
Start with the checks you can perform before the tow vehicle moves.
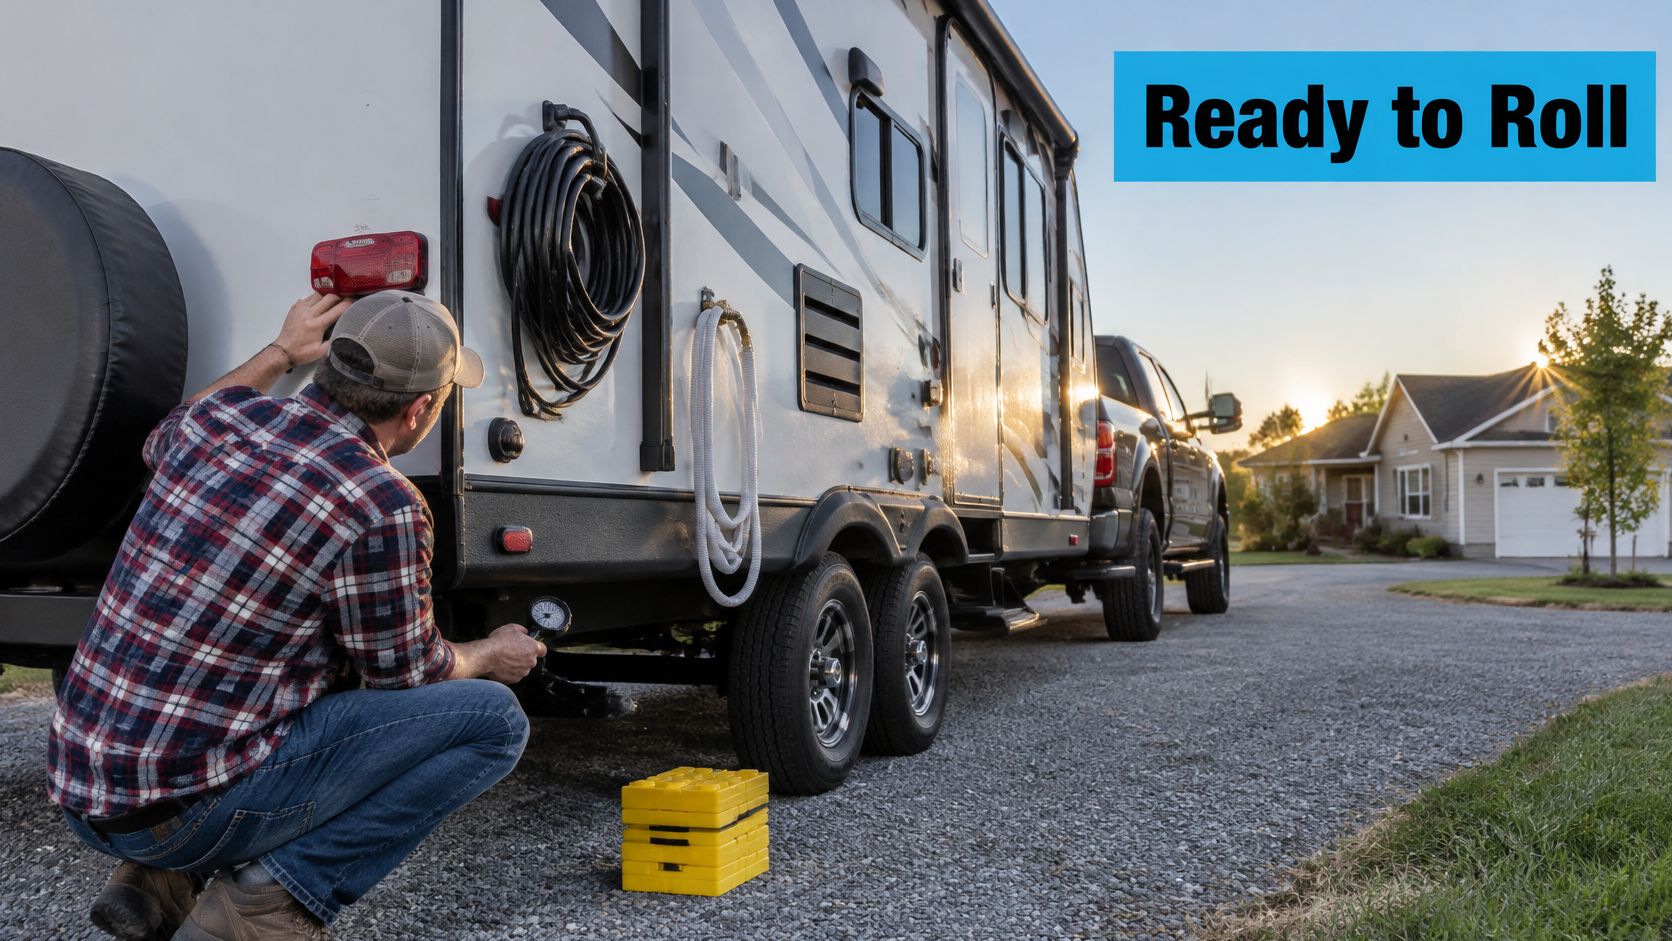
Put the foundation ahead of the accessories
The RV Industry Association identifies NFPA 1192 as the principal recreational-vehicle standard covering fuel systems and equipment, plumbing, fire and life safety, and vehicle requirements. Its overview of association and ANSI-adopted standards is a useful reminder that safe infrastructure comes before decorative upgrades.
Departure rule: Recognized standards, correct installation, periodic inspection, and trailer-specific instructions take priority over novelty equipment.
Keep the owner's manuals accessible, and turn their requirements into a repeatable routine. For help organizing ongoing care, SwiftJet's guide for RV owners on upkeep provides a useful maintenance-planning resource.
Arrival preparation belongs in that routine, too. Review how to level an RV before your trip, then identify the approved leveling and support equipment for your trailer. Don't assume that every jack, block, or support performs the same job.
The highest-value preparation protects the towing combination, keeps essential services available, and suits the trip you intend to take.
Building a Practical Must-Have Priority System
A travel trailer combines the responsibilities of a house, a boat, and a toolbox. You need a habitable interior, you must manage limited onboard resources, and you need practical ways to inspect and maintain the equipment. Luxury only makes sense after those responsibilities are covered.
Use a priority hierarchy rather than buying everything another owner recommends.
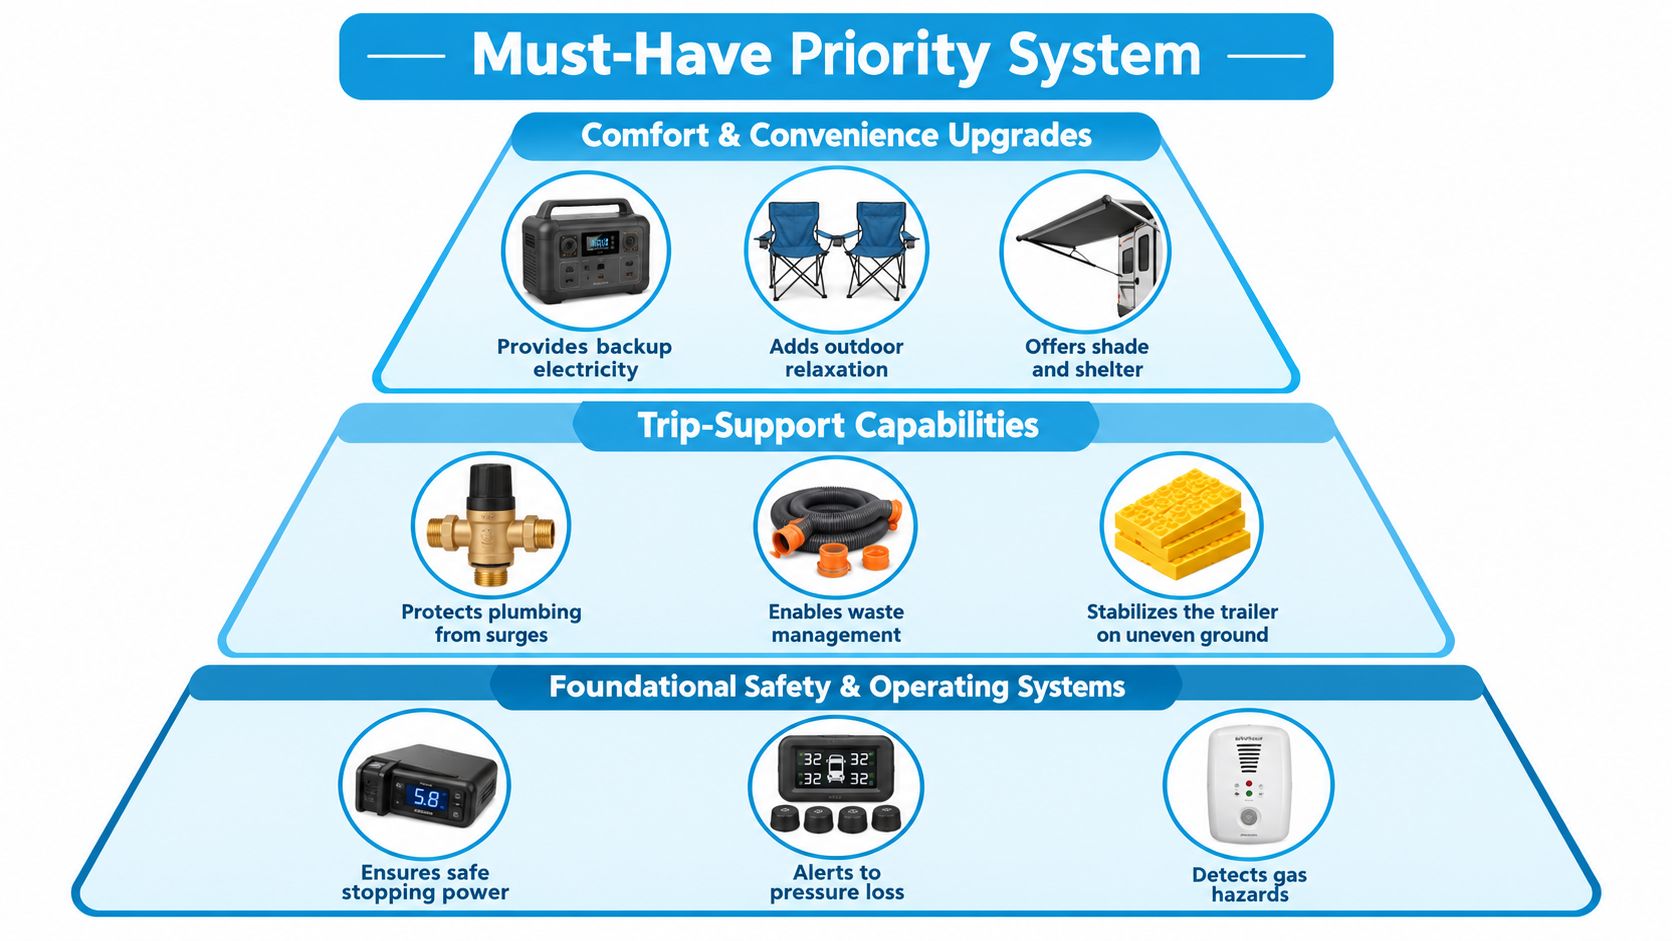
Separate essentials from trip-dependent equipment
Foundational safety and operating systems belong at the bottom of the pyramid because everything else depends on them. This category includes serviceable towing equipment, maintained utilities, hazard detection, and sound construction. An unresolved brake or plumbing problem belongs on the repair list, not behind a furniture purchase.
Trip-support capabilities depend on where and how you camp. A hookup-equipped campground and a remote campsite create different requirements for charging, sanitation, communications, and supplies. Backup electricity might be an optional convenience for casual camping but an operating requirement when someone depends on powered equipment.
Comfort and convenience upgrades should solve a demonstrated problem. Better bedding may deserve priority if you can't sleep comfortably. An outdoor television probably doesn't deserve priority if you still can't verify your remaining battery capacity.
The equipment's role matters more than its marketing category. A portable power station, for example, shouldn't automatically be treated as either essential or unnecessary.
Audit your own trailer
Make a working inventory with these columns:
| Inventory field | What to record |
|---|---|
| Existing equipment | What's installed or already packed |
| Operating condition | Tested, needs attention, or unknown |
| Trip requirement | What you'll need it to do |
| Missing capability | The actual problem to solve |
| Purchase consequence | Added weight, power demand, or storage needs |
Then walk through a normal camping day, from making breakfast to locking up at night. Include tasks that happen outside, such as connecting utilities or accessing tools in poor weather.
- Match the occupants: Consider sleeping arrangements, mobility, privacy, and who will operate each system.
- Match the itinerary: Identify campground services, likely weather, and opportunities to replenish supplies.
- Match the work: Decide whether losing internet or charging access would interrupt paid responsibilities.
Don't buy around an unknown. Test what you already own, identify the limitation, and purchase equipment that addresses that limitation specifically.
Protecting Safety and Weight Capacity
The trailer and tow vehicle must work as one hauling system. Trailer length alone won't tell you whether the combination is suitable, and a hitch that physically connects isn't proof that every rating is satisfied.
NHTSA advises checking the manufacturer's fully loaded tongue-weight specification against the tow vehicle's axle ratings, which appear on its certification label. Its guidance on tongue weight and towing capacity also explains that excessive tongue weight without load leveling can reduce front-wheel traction and affect steering.
Inspect the connection and running gear
Build your road-safety kit around compatible, correctly rated equipment. The RV Industry Association's standards and regulations guidance includes recommended practices for trailer-wheel assembly and attachment, reinforcing the importance of following the applicable installation procedure rather than guessing.
- Hitch and coupler: Verify ratings, engagement, locking hardware, and installation against manufacturer instructions.
- Chains and breakaway protection: Check attachment points and cable routing for your particular setup.
- Brakes and lights: Confirm operation using the procedures for the trailer and tow vehicle.
- Tires and wheels: Use the manufacturer's specified pressure and wheel-attachment procedure. Carry a pressure gauge and a compatible spare with the correct load rating.
- Wheel chocks: Keep suitable chocks accessible when parking and disconnecting.
A weight-distribution or sway-control system may be appropriate, but selection and adjustment must follow the towing combination's requirements. Don't treat an added device as permission to exceed a rating.
Measure the trailer you're actually towing
Dry weight isn't departure weight. NHTSA defines total trailer weight as the standard-equipped trailer plus options, fresh water, liquid waste, and cargo; the loaded trailer must remain within GVWR, while axle loads must remain within GAWR, according to its trailer loading and weighing guidance.
That guidance describes public-scale measurements of the tow vehicle's rear axle while connected, the trailer wheels while connected, and the trailer wheels plus tongue jack while disconnected. Arrange the procedure with the scale operator and follow the equipment manufacturers' instructions.
Load heavy items low, distribute cargo side to side, and secure it against movement. Leave room in your planning for changing tank contents and supplies collected during the trip.
Prepare for hazards inside
Keep a suitable fire extinguisher accessible and check its condition according to its instructions. Verify that smoke, carbon-monoxide, and propane detection equipment is present and operational.
For propane, Texas Department of Insurance RV fire-safety guidance recommends checking lines and tanks for leaks, keeping a leak detector, and shutting propane off while traveling or when unused. If you detect an unidentified propane odor, follow its evacuation guidance, open doors and windows, leave the RV, and shut the tank valve if you can do so safely.
Road-ready hardware and practiced safety procedures are essentials. Equipment that merely makes setup more convenient belongs further down the list.
Powering Essential Trailer Systems Away From Hookups
Think of electricity as a supply-and-demand problem. A larger battery won't correct unsuitable wiring, and more solar won't tell you which appliance consumed the available energy.
Use the diagram as an orientation, not an installation schematic. Your trailer's actual connections, ratings, and charging arrangements must follow its documentation.
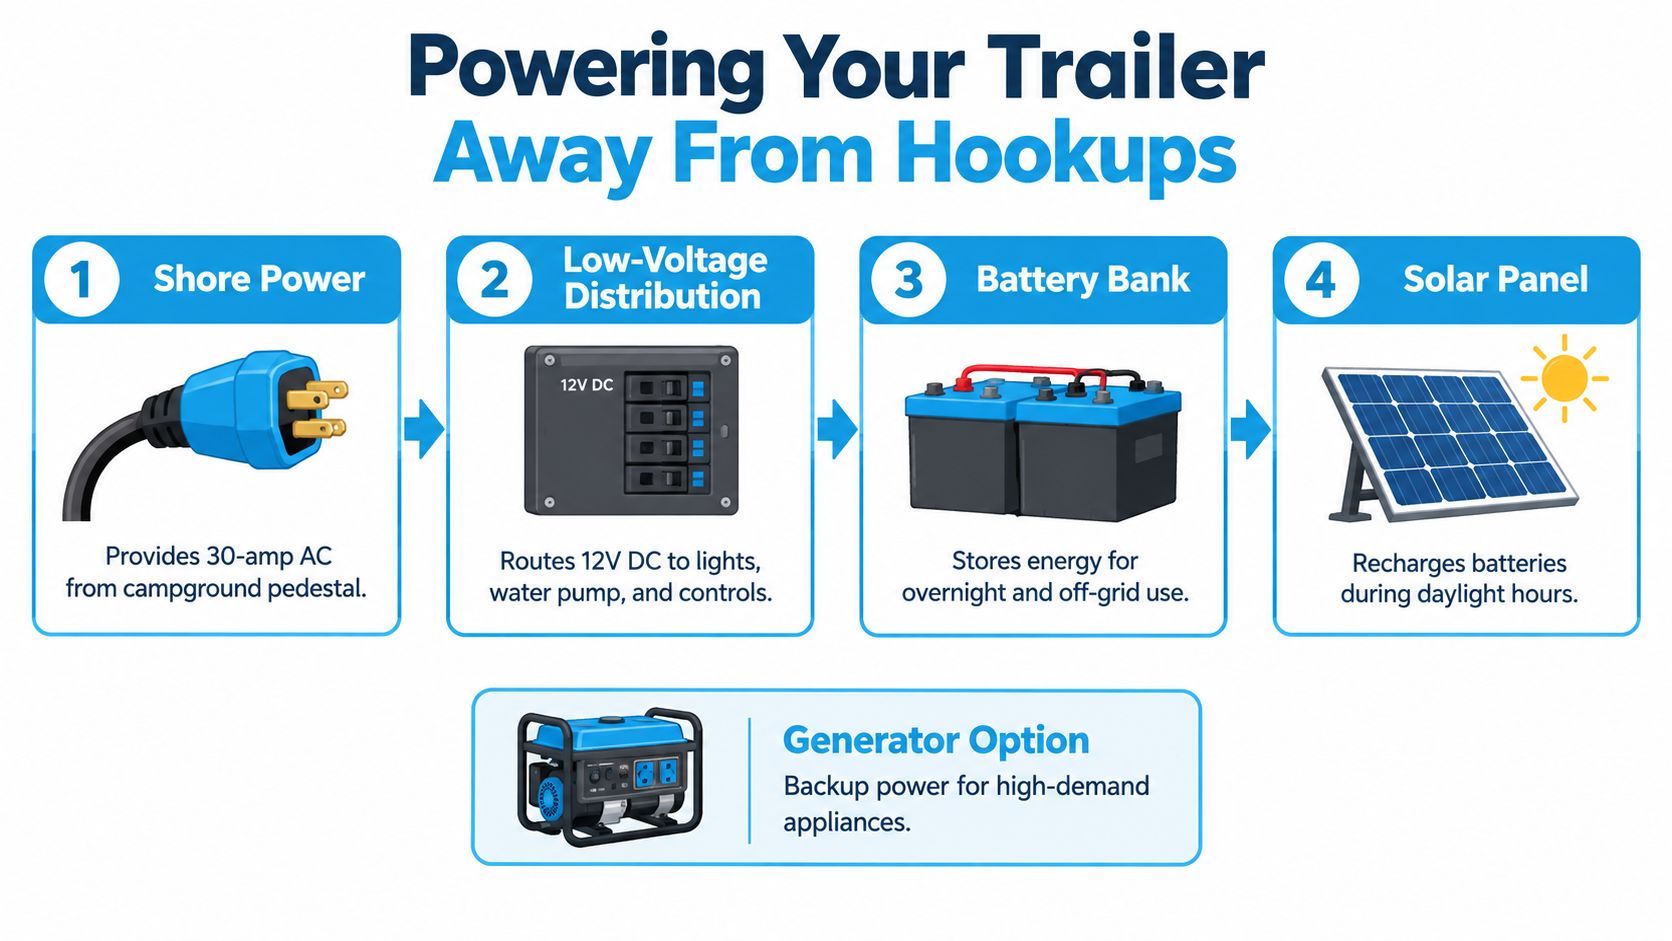
Understand what each component does
Shore power connects the trailer to an external electrical supply. The converter or charger supports battery charging and the trailer's low-voltage system as designed, while the battery stores energy for use away from that supply.
An inverter serves a different purpose: it lets compatible equipment use battery energy through household-style alternating-current power. It doesn't create additional energy, so include conversion losses when calculating demand.
Before changing batteries, review compatibility with the charger, mounting arrangement, protection, and intended loads. This guide to choosing an RV trailer battery can help frame the questions to discuss with your installer.
Build a remote-work energy budget
Consider a workday involving a laptop, monitor, phone hotspot, router, refrigerator controls, lighting, and charging equipment. Don't combine them into a single vague category called electronics.
Record each device's measured or documented power demand, expected operating time, and supply path. Daily watt-hours equal watts multiplied by operating hours; add the loads together, then account for inverter and charging losses where applicable.
| Load group | What to verify |
|---|---|
| Direct-current equipment | Operating demand and how long it remains active |
| Inverter-powered equipment | Device demand plus inverter consumption |
| Refrigeration and heating controls | Actual operating requirements for the installed appliance |
| Charging equipment | Which devices charge together and when |
Available boondocking power guidance describes a house battery providing about 50–95 amp-hours against roughly 100 amp-hours of daily trailer consumption, which can leave power unavailable on the second night without replenishment. Treat those figures as a warning to measure your own setup, not as a capacity promise.
The most useful upgrade may be a battery monitor and a load-priority plan, not another solar panel.
Rehearse cloudy-weather operation
Test the intended routine before departure, including a low-sun period. Decide which loads you'll reduce first, such as an extra monitor or entertainment equipment, while preserving essential controls and communications.
Generators are only an option where rules and operating conditions permit them. Have qualified help handle unfamiliar work involving shore-power wiring, transfer equipment, battery protection, or changes to cable sizing.
Use the following video alongside your manuals, not as a replacement for trailer-specific instructions.
Building Reliable RV Connectivity
A connection that opens a weather page may still be unsuitable for a scheduled video call. Start with the work you must complete, then choose an access path and backup workflow.
For email, you might tolerate delays and work offline between connections. Video meetings require a more consistent connection, while large uploads need a plan for transferring files without disrupting other users.
The comparison below introduces common access paths. Treat illustrated device counts and broad coverage descriptions as examples, not guarantees for a particular product or campsite.
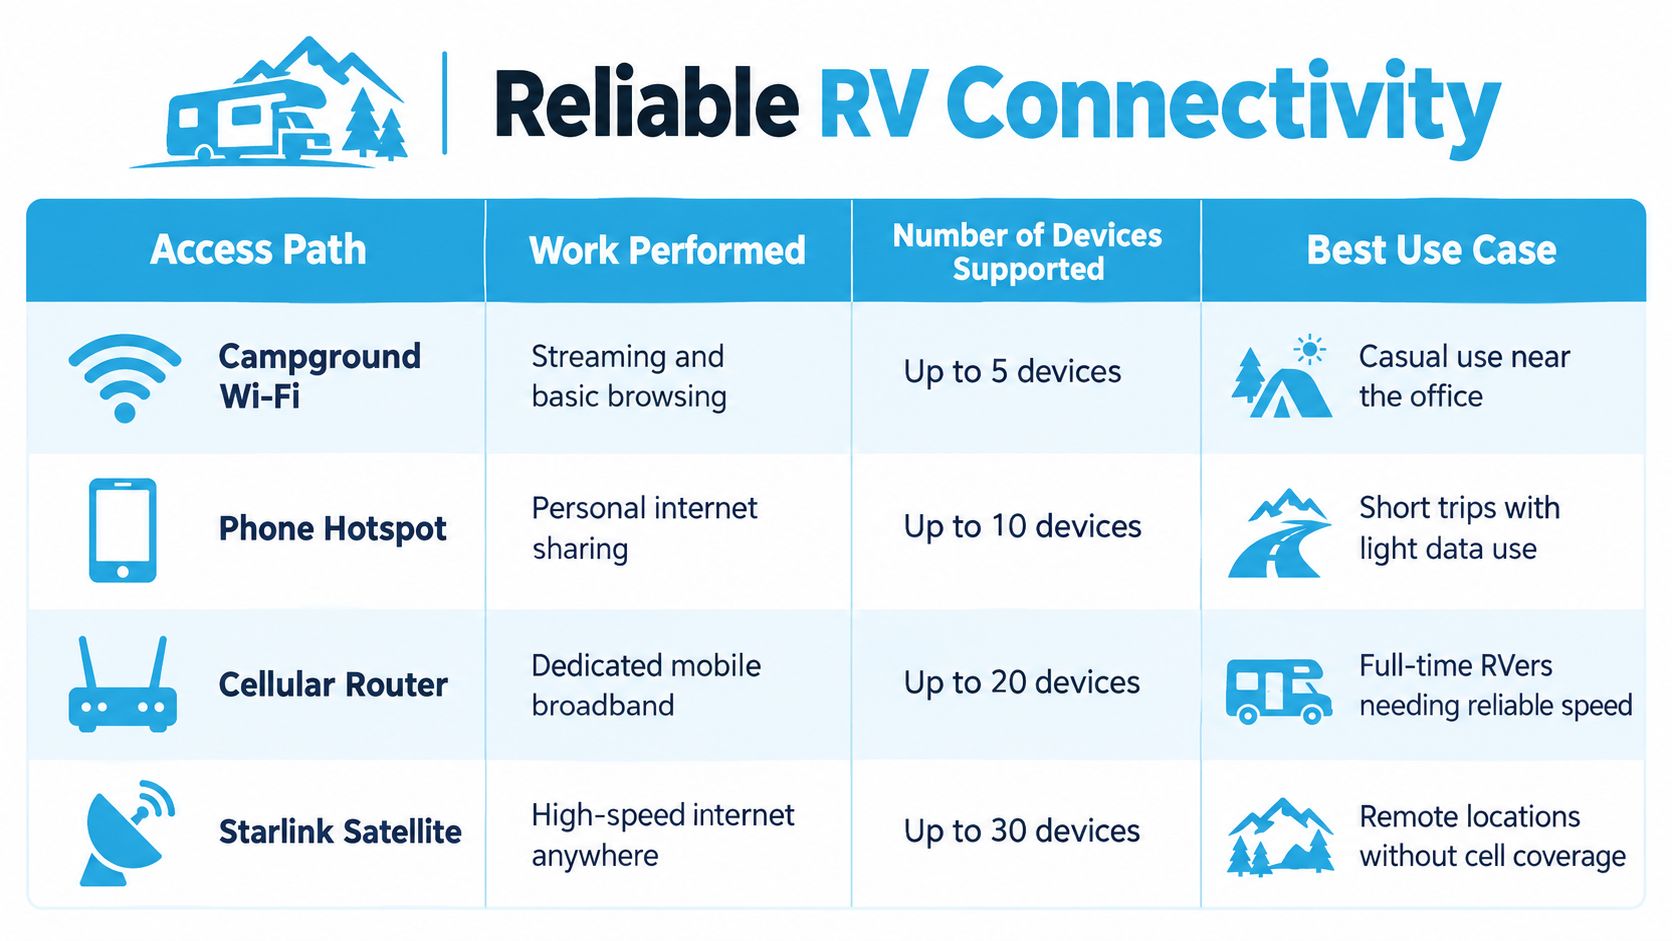
Compare the whole working arrangement
| Access path | Questions to answer before depending on it |
|---|---|
| Campground Wi-Fi | Can you test it from your site, and what happens when other guests are online? |
| Phone hotspot | Does your plan support the intended use, and can the phone remain available for calls? |
| Cellular router | Which networks are available, where can you place it, and what power does it require? |
| Satellite service | Are the installation location, service terms, power demand, and campsite restrictions suitable? |
Signal bars aren't a work-readiness test. Include congestion, carrier availability, terrain, tree cover, and network handoffs in your planning rather than relying on signal strength alone. The practical approach is to test the tasks you need to perform, not just whether the device connects.
SwiftNet's 4G Bronze hotspot and 5G Diamond router are available options alongside phone hotspots, campground networks, and other services. Compare them against your destinations, equipment needs, and backup plan rather than assuming any single service will work everywhere.
Prepare for a connection failure
Before leaving, check anticipated coverage and identify an alternative place to work if the campsite connection proves inadequate. Where feasible, arrange independent access paths rather than backups that depend on the same unavailable network.
- Test placement: Try manufacturer-approved router or external-antenna arrangements before making permanent installations.
- Save essential files: Keep current offline copies of documents, contact details, directions, and work instructions.
- Create a low-bandwidth workflow: Be ready to switch from video to audio or postpone nonessential transfers.
- Budget the electricity: Include networking equipment in the power audit, especially if it stays on outside working hours.
Keep power adapters and charging backups with the work equipment rather than scattered through storage compartments. A connection plan isn't complete until you know how you'll power it and what you'll do when it fails.
Choosing Comfort Gear for Real Travel Scenarios
On a hot family camping trip, useful comfort equipment might include shade, suitable ventilation, drinking-water access, and bedding that feels comfortable in the conditions. An oversized entertainment setup won't address an uncomfortable sleeping area.
For a cold-weather weekend, start by checking the installed heating system and the trailer manufacturer's operating restrictions. Don't assume a portable heater is an interchangeable substitute for the built-in system.
Choose gear around the day you'll live
Use representative situations to decide what deserves storage space:
- Warm afternoons: Consider a compatible fan, an approved shade arrangement, and a plan for keeping occupied spaces comfortable.
- Cold evenings: Prioritize suitable bedding, clothing, and properly serviced heating equipment.
- Rainy days: Pack drying supplies, manageable indoor activities, and a way to separate wet footwear from living areas.
- Longer family stays: Consider privacy curtains, reading lights, and individual storage locations.
- Travel with pets: Plan where the animal will rest and how you'll maintain suitable conditions while supervising it.
A cooler and an electric cooling appliance serve different purposes. Compare the supplies, electricity, cleaning, and storage each requires before choosing either.
Test comfort without compromising access
For cooking, rehearse a familiar meal using the equipment you intend to carry. You may discover that nesting cookware and a practical preparation area matter more than another countertop appliance.
Check that bedding, chairs, and storage organizers don't obstruct exits, vents, controls, or service panels. Use manufacturer-approved mounting methods for anything attached to walls or cabinets, and verify clearances around heating and cooking equipment.
Buy after rehearsal: If an item doesn't solve a problem during a driveway trial, postpone it until experience shows you need it.
Choose entertainment that fits the available resources. Downloaded reading material, games, and modest lighting may suit a quiet evening better than equipment requiring continuous internet and substantial electricity.
Comfort is personal, but compatibility isn't optional. Every addition still needs an appropriate place to operate, a safe place to travel, and room in the trailer's remaining capacity.
Planning Water, Waste, and Storage Capacity
A hookup-dependent trip and a dry-camping trip require different preparations. At a serviced campground, your priority may be compatible connections and correct setup. Away from hookups, you also need a realistic replenishment and disposal plan.
Don't estimate your stay from the fresh-water tank alone. Consider drinking, cooking, washing, toilet use, and where the resulting wastewater will go.
Keep clean and dirty equipment separate
| Capability | Hookup-oriented preparation | Dry-camping preparation |
|---|---|---|
| Fresh water | Suitable potable-water connection equipment | Verified onboard supply and replenishment plan |
| Plumbing | Compatible fittings and pressure-control equipment | Tested pump and accessible service points |
| Waste handling | Suitable hose, connections, and drainage arrangement | Holding capacity awareness and a legal disposal destination |
| Storage | Accessible setup equipment | Room for supplies without blocking maintenance access |
Follow the trailer's sanitation procedure and keep potable-water equipment separate from sewer-handling supplies. Use the RV water-tank cleaning guide when planning maintenance, while checking product compatibility and manufacturer instructions.
If the water heater needs diagnosis rather than routine care, Class A RV Repairs heater service provides a focused resource for discussing repair or replacement. Don't compensate for a malfunction by repeatedly resetting equipment without identifying the cause.
Organize for use and inspection
- Daily necessities: Place cooking supplies, toiletries, and frequently used tools where you can reach them easily.
- Outdoor equipment: Provide secure storage that accounts for moisture, dirt, weather exposure, and privacy.
- Service areas: Keep batteries, plumbing connections, shutoffs, and inspection points accessible.
- Maintenance supplies: Carry compatible products for tanks, lines, seals, and compartment care, following their instructions.
During packing, check storage areas for leaks, damaged seals, odors, and anything pressing against equipment. Include detector maintenance in the same recurring routine.
The U.S. Fire Administration's RV fire-safety guidance identifies improper generator use as a leading cause of carbon-monoxide poisoning and recommends working CO and smoke alarms in all RVs, tested monthly. Keep exhaust-producing equipment outside your storage and living-space planning, and follow its operating instructions.
Building Your Final Departure Checklist
Your final checklist should verify capability, not merely count possessions. Write it around your trailer's manuals and the itinerary, then use the same sequence each time so interruptions don't cause you to skip a task.
Make a safety pass
- Towing documentation: Confirm that the loaded combination matches the ratings and measurements established during preparation.
- Running gear: Complete the prescribed tire, wheel, brake, and light checks.
- Connection hardware: Verify the hitch, coupler, chains, and breakaway arrangement.
- Interior protection: Check alarms, extinguisher access, propane controls, and unobstructed exits.
If anything remains uncertain, resolve it before departure. A partly understood safety concern isn't something to test on the highway.
Make an operating pass
Check the systems in the configuration you'll use at camp, not only while connected at home.
- Utilities: Confirm charging, lighting, water delivery, waste arrangements, and the intended heating operation.
- Work equipment: Open required files, test communications, and pack the associated charging equipment.
- Cargo: Secure the load and preserve access to frequently used items and service areas.
Then apply the itinerary test:
| Planned trip | Final question |
|---|---|
| Short campground stay | Do the reservations and available hookups match the equipment packed? |
| Remote camping | Can you replenish resources or leave before essential supplies become inadequate? |
| Remote-work travel | Can you finish critical tasks if the primary connection or charging plan fails? |
Leave optional purchases optional
Pack the equipment that supports the planned trip before adding extras. For a separate check of leisure and outdoor items, browse the weekend camping guide from Lounge Wagon after completing the trailer's operating checks.
#rv #rvlife #rvliving #rvlifestyle #rvrenovation #rvremodel
#rvtravel #rvcamping #rvadventures #ruralwifi #5gwifi
#5ginternet
The right must haves for travel trailers are the ones that close a real gap in safety, habitability, or the way you travel. Verify product instructions and trailer-specific requirements before installation or use, and make your next purchase from the problems your rehearsal uncovered.
SwiftNet Wifi offers virtual-SIM internet plans connecting through AT&T, Verizon, and T-Mobile, with plans starting at $49.99 per month, a 7-day risk-free trial, no contracts, and no hidden fees. Visit SwiftNet Wifi to compare connectivity options for your trailer, then include your chosen equipment in your coverage checks and off-grid power test before departure.


